Reading Time: 12 mins

Are you wondering how to introduce your child to the exciting world of programming? You’re not alone. Many parents today recognize that coding skills are becoming as essential as reading and writing, but they’re unsure where to start. The good news is that Scratch, a visual programming language designed specifically for kids, makes learning to code fun, engaging, and accessible for young minds.
At ItsMyBot, we’ve taught thousands of children how to use Scratch effectively, and I’ve seen firsthand how this incredible tool transforms kids from passive technology consumers into confident creators. In this comprehensive guide, you’ll discover everything you need to know about how to use Scratch, from basic setup to creating amazing projects that will inspire your child’s creativity and problem-solving skills.
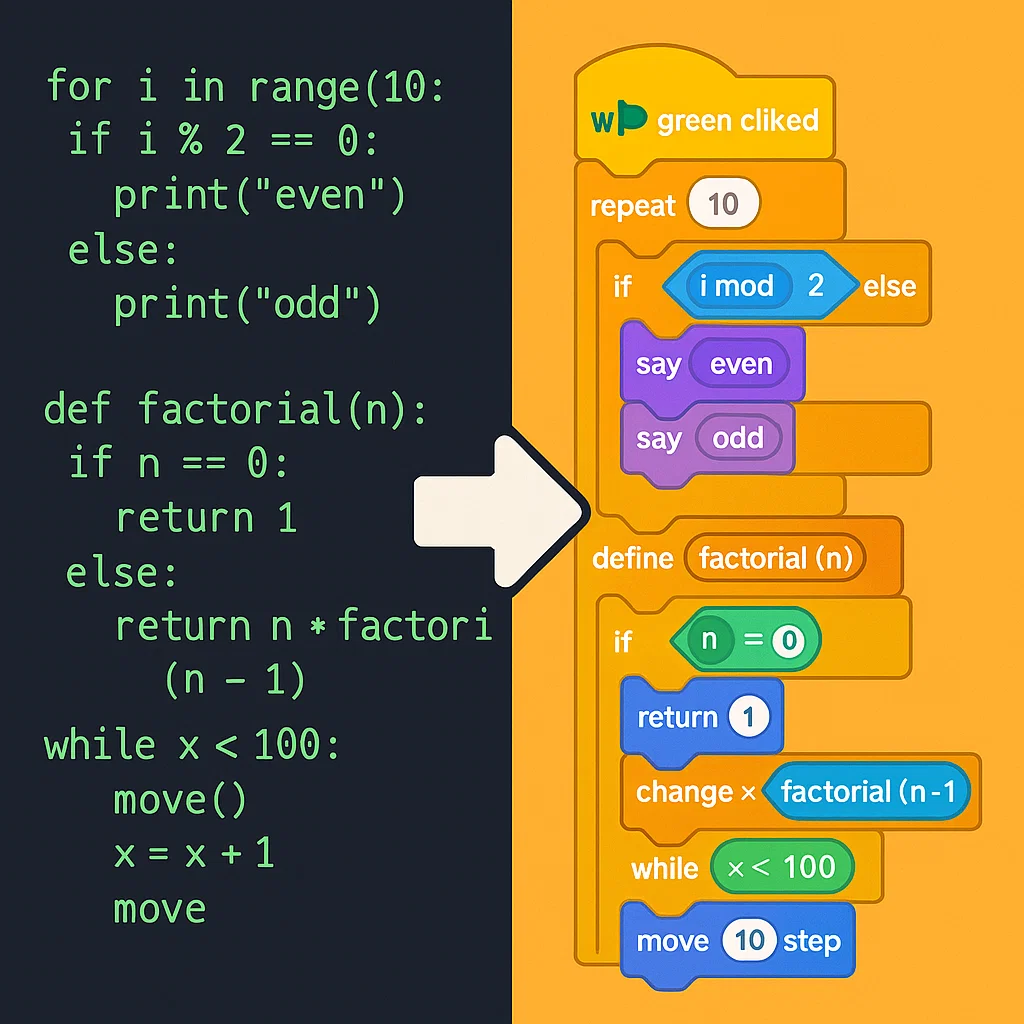
Scratch is a free, visual programming language developed by MIT’s Lifelong Kindergarten Group specifically for children aged 8-16. Unlike traditional text-based programming languages, Scratch uses colorful blocks that snap together like digital LEGO pieces, making it intuitive for young learners to understand programming concepts without getting bogged down by complex syntax.
The beauty of learning how to use Scratch lies in its accessibility. Children can create interactive stories, games, and animations while learning fundamental programming concepts like loops, conditionals, variables, and events. According to recent studies, students who learn visual programming languages like Scratch show improved logical thinking skills and better performance in mathematics and science subjects.
Develops Computational Thinking: When children learn how to use Scratch, they naturally develop computational thinking skills. They learn to break down complex problems into smaller, manageable parts – a skill that extends far beyond programming.
Encourages Creativity: Unlike many educational tools that have rigid structures, Scratch empowers kids to express their creativity. Whether they want to create a music player in Scratch or design an interactive story, the possibilities are endless.
Builds Confidence: The immediate visual feedback in Scratch helps children see their progress instantly. When they connect blocks and watch their sprite move or change color, they experience the satisfaction of making something work – a powerful confidence booster.
Prepares for Future Learning: Understanding what block coding is through Scratch creates a solid foundation for more advanced programming languages like Python or JavaScript later on.
Before diving into how to use Scratch effectively, you need to set up your programming environment. The great news is that Scratch is completely free and accessible in multiple ways.
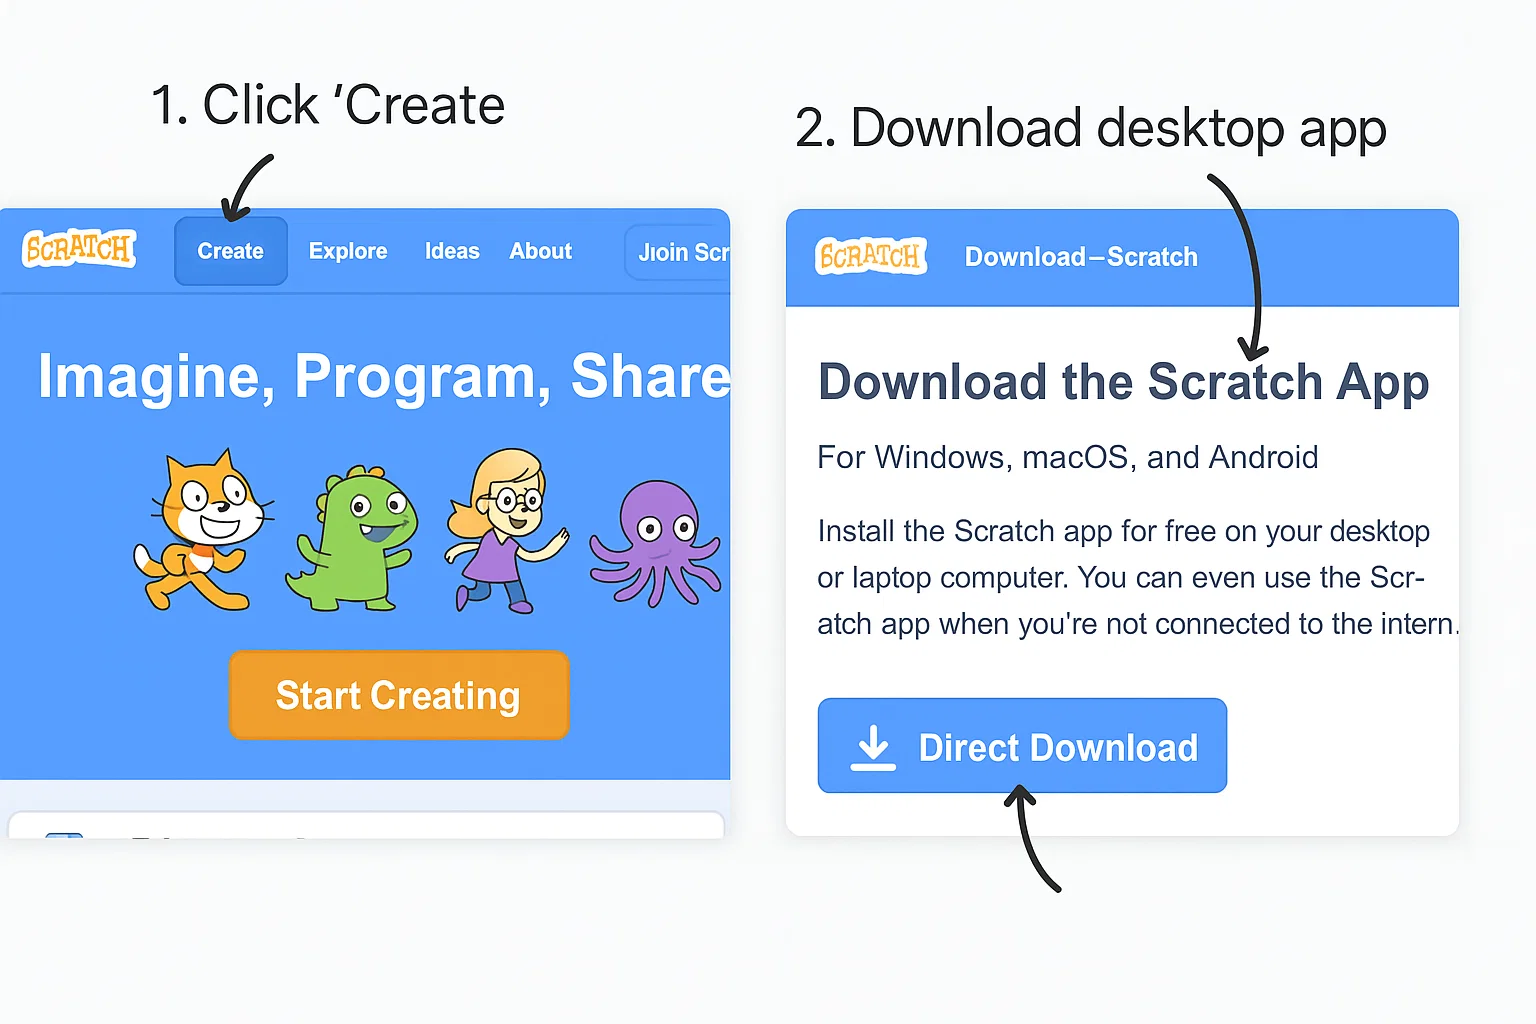
The easiest way to start learning how to use Scratch is through the online editor at scratch.mit.edu. Simply open your web browser, navigate to the site, and click “Create” to start programming immediately. This option requires an internet connection but ensures you always have the latest version.
For offline programming or areas with limited internet connectivity, you can download Scratch 3 to your computer. This standalone application provides the same functionality as the online version but works without an internet connection.
While you can use Scratch without an account, creating one allows you to save projects, share creations with the community, and access additional features. The registration process is straightforward and designed with children’s privacy in mind.
Learning how to use Scratch becomes much easier once you understand the interface layout. The Scratch programming environment consists of several key areas, each serving a specific purpose in the coding process.

The Stage is the rectangular area in the upper-right corner where your animations, games, and stories play out. Think of it as a theater stage where your characters (called sprites) perform. The Stage measures 480 x 360 pixels and uses a coordinate system that places (0,0) at the center.
Sprites are the objects that perform actions in your Scratch projects. The default sprite is the iconic Scratch Cat, but you can add, delete, or modify sprites to suit your project’s needs. Each sprite can have its own scripts, costumes (different appearances), and sounds.
The Blocks Palette contains all the programming commands organized into color-coded categories. Understanding these types of blocks in Scratch is crucial for effective programming:
The Scripts Area is your workspace where you drag and connect blocks to create programs. This is where the magic happens – where individual blocks combine to create complex behaviors and interactions.
To effectively learn how to use Scratch, you must understand the fundamental blocks that form the building blocks of every project. Let me walk you through the most important blocks that every young programmer should master.
The “move 10 steps” block is often the first block children learn when discovering how to use Scratch. This simple blue block moves a sprite forward by a specified number of steps. Combined with the “turn 15 degrees” blocks, young programmers can create complex movement patterns.
For precise positioning, the “go to x: y:” block allows you to place sprites at exact coordinates on the stage. This is particularly useful when creating games where sprites need to return to specific starting positions.
The “say Hello! for 2 seconds” block provides an easy way for sprites to communicate with users. This purple block creates speech bubbles and is perfect for interactive stories and educational projects.
The “switch costume to” block enables sprite animation by changing appearances. Many young programmers use this feature to create walking animations or character transformations in their projects.
Audio brings projects to life, and the “play sound” block makes it simple to add music and sound effects. Whether you’re creating a Flappy Bird game on Scratch or an interactive story, sound blocks enhance the user experience significantly.
The “forever” loop is one of the most powerful blocks for beginners learning how to use Scratch. This orange block repeats any blocks placed inside it continuously, making it perfect for creating ongoing animations or game mechanics.
The “if-then” block introduces conditional logic, allowing sprites to make decisions based on specific conditions. This block is essential for creating interactive games and responsive animations.
Now that you understand the interface and basic blocks, let’s create your first project together. I recommend starting with a simple animation that demonstrates core concepts while building confidence.
This beginner-friendly project will teach essential skills while creating something fun and engaging. Here’s how to build it step by step:
Step 1: Plan Your Animation Before placing any blocks, think about what you want your cat to do. We’ll create a simple dance routine with movement, costume changes, and music.
Step 2: Add Movement Blocks Start by dragging a “when green flag clicked” event block to the Scripts Area. This yellow block ensures your animation starts when users click the green flag.
Next, add a “forever” loop below the event block. Inside the loop, place a “move 10 steps” block followed by a “turn 15 degrees” block. This creates continuous circular movement.
Step 3: Add Visual Effects To make the cat dance, add a “switch costume to” block inside the forever loop. Set it to alternate between the cat’s two default costumes, creating a walking animation effect.
Step 4: Include Sound Add a “play sound Meow for 1 beats” block to give your dancing cat a voice. Experiment with different sounds and timing to match the animation rhythm.
Step 5: Test and Refine Click the green flag to test your animation. Adjust the movement speed, rotation angle, and timing until you’re satisfied with the dance routine.
This simple project introduces event handling, loops, movement, costume changes, and sound integration – fundamental concepts in Scratch programming.
Once you’ve mastered the basics of how to use Scratch, it’s time to explore advanced features that unlock more creative possibilities. These techniques separate beginner projects from truly impressive creations.
Variables in Scratch store information that changes during program execution. For example, in a game, you might use a “score” variable to track points or a “speed” variable to control how fast characters move.
To create a variable, click “Make a Variable” in the Variables blocks category. Give it a descriptive name and decide whether it applies to all sprites or just one specific sprite.
Cloning creates identical copies of sprites during program execution, enabling complex effects like falling raindrops, enemy armies, or particle systems. However, beginners often encounter cloning bugs in Scratch that can be frustrating to debug.
The key to successful cloning is understanding that clones inherit the parent sprite’s scripts but maintain independent positions and properties. This means you can create multiple copies that behave similarly but act independently.
Custom blocks allow you to group frequently used code into reusable components. Think of them as your own personal tools that simplify complex programming tasks. When learning how to use Scratch effectively, custom blocks help organize code and reduce repetition.
To create a custom block, click “Make a Block” in the My Blocks category. Design blocks that perform specific tasks, like “draw square” or “reset game,” making your programs cleaner and more manageable.
After teaching hundreds of children how to use Scratch, I’ve identified common mistakes that can frustrate young programmers. Understanding these pitfalls helps you guide your child through challenging moments.
The most common error beginners make is creating scripts without proper event blocks. Scripts need triggers to execute – whether it’s “when green flag clicked,” “when key pressed,” or “when sprite clicked.”
Solution: Always start scripts with an appropriate event block. Think of events as the “start button” for your code.
While forever loops are powerful, sometimes beginners create loops that never allow other scripts to run, causing programs to appear frozen.
Solution: Use “wait” blocks inside loops to give other scripts time to execute, or use repeat loops when you need specific iteration counts.
The Scratch coordinate system can confuse beginners, especially when sprites disappear off-stage or appear in unexpected locations.
Solution: Practice with the “go to x: y:” block to understand how coordinates work. Remember that (0,0) is the stage center, not the top-left corner like many computer graphics systems.
Game development in Scratch teaches advanced programming concepts while maintaining engagement through play. Let’s explore how to create popular game types that demonstrate different programming skills.
Maze games in Scratch teach collision detection, sprite control, and level design. These projects help children understand how user input translates to character movement while introducing basic physics concepts.
The key to successful maze games lies in collision detection using the “touching color” sensing block. This technique prevents players from walking through walls while allowing smooth navigation through open pathways.
Platformer games on Scratch introduce gravity simulation, jumping mechanics, and level progression. These projects challenge young programmers to think about game physics and character controller design.
Essential platformer concepts include gravity variables that constantly pull characters downward, jump mechanics that temporarily overcome gravity, and collision detection that prevents characters from falling through solid platforms.
Clicker games on Scratch focus on incremental mechanics, upgrade systems, and user interface design. These projects teach children about exponential growth, resource management, and reward systems.
The core loop involves clicking to earn resources, spending resources on upgrades that increase earning potential, and balancing progression to maintain engagement without making advancement too easy or too difficult.
As a parent, your role in supporting your child’s coding journey is crucial for maintaining motivation and overcoming challenges. Here are proven strategies that help children succeed with Scratch programming.
Establish a dedicated workspace where your child can code without distractions. This doesn’t require expensive equipment – a basic computer with internet access is sufficient for learning how to use Scratch effectively.
Encourage experimentation over perfection. Scratch is designed for exploration, and “failures” often lead to unexpected discoveries. Celebrate creative attempts even when projects don’t work as initially planned.
Learning how to use Scratch follows a predictable progression. Initially, children focus on making things move and change. Next, they experiment with user interaction and sound. Advanced learners tackle complex logic, variables, and sophisticated game mechanics.
Don’t rush this progression. Each stage builds essential skills that support more advanced concepts. A child who thoroughly understands basic movement and events will find advanced features much more accessible.
The Scratch website features a vibrant community where young programmers share projects, provide feedback, and inspire each other. Encourage your child to explore others’ projects for inspiration and learning opportunities.
However, maintain appropriate supervision and discuss online safety principles. The Scratch community is generally positive and educational, but teaching digital citizenship remains important.
While Scratch provides an excellent introduction to programming concepts, many children eventually want to explore text-based programming languages. Understanding this transition helps you guide your child’s continued learning journey.
Python’s syntax closely mirrors Scratch’s logical structure, making it an ideal next step. Many concepts translate directly: Scratch’s “forever” loops become “while True:” loops in Python, and conditional “if-then” blocks become “if:” statements.
Consider introducing Python through visual environments like Pygame or turtle graphics, which provide immediate visual feedback similar to Scratch’s sprite-based system.
Children interested in creating websites can transition from Scratch to HTML, CSS, and JavaScript. The logical thinking skills developed through Scratch programming apply directly to web development challenges.
Start with simple HTML structure and CSS styling before introducing JavaScript programming concepts. Many online platforms offer visual web development tools that bridge the gap between Scratch and traditional web programming.
Robotics and coding represent natural extensions of Scratch programming skills. Platforms like micro:bit and Arduino provide physical programming experiences that build on visual programming foundations.
These platforms often support block-based programming interfaces similar to Scratch, making the transition smoother while introducing real-world applications of programming concepts.
Learning how to use Scratch opens doorways to creativity, logical thinking, and digital literacy that serve children throughout their lives. This visual programming language transforms abstract programming concepts into tangible, interactive experiences that engage young minds naturally.
At ItsMyBot, we’ve witnessed countless children discover their passion for technology through Scratch programming. The confidence, creativity, and problem-solving skills they develop extend far beyond coding, positively impacting their academic performance and future career prospects.
Remember that learning how to use Scratch is a journey, not a destination. Each project builds skills, confidence, and understanding that prepare young learners for increasingly complex challenges. Whether your child becomes a professional programmer or simply develops better logical thinking skills, the time invested in Scratch programming pays dividends throughout their educational journey.
The most important advice I can offer is to maintain patience, celebrate creativity, and encourage exploration. Scratch programming should be fun, engaging, and confidence-building. When children enjoy the learning process, they naturally develop deeper skills and maintain long-term interest in technology.
Ready to start your child’s programming journey? Visit the official Scratch website, create an account, and begin exploring this incredible tool together. The future belongs to those who understand technology, and Scratch programming provides the perfect foundation for that understanding.
For more comprehensive guidance on scratch coding for kids, explore our extensive library of tutorials, project ideas, and benefits of coding for elementary kids. Together, we can help young minds discover the joy of creation through programming.
About the Author: With over 15 years of experience in technology education and having taught thousands of children how to use Scratch effectively, I’ve seen firsthand how visual programming languages transform young learners into confident creators. At ItsMyBot, we’re passionate about making technology education accessible, engaging, and inspiring for the next generation of innovators.