Reading Time: 12 mins
Your child stares at a screen for hours — but what if that screen time built a real, future-ready skill? Most kids consume content. Scratch animation flips the script: your child becomes the creator.
In this project, your child will build a complete Scratch animation where the Scratch Cat walks onto the stage, waves, and says hello — then responds to keyboard controls that change its costume, size, colour, and visual effects. No typing required. Just drag, snap, and create.
This is how great coders start. Let’s build something brilliant together.
Scratch is a free, visual block-based coding platform developed by MIT. It lets kids drag and snap colourful code blocks together to create animations, games, and interactive stories — with zero typing required.
Scratch animation is the process of making a sprite move, change appearance, and respond to inputs over time. It introduces children to foundational programming concepts like loops, events, and conditionals — all wrapped inside a creative, playful environment.
According to the Scratch Foundation, over 100 million registered users have created projects on the platform. It’s the world’s largest coding community for kids — and animation is where most beginners start their journey.
What makes Scratch particularly powerful is how naturally it connects to bigger ideas. The loop thinking your child practises here is the same computational thinking used in robotics, AI, and software development — they just don’t realise it yet, because it feels like play.
Go to scratch.mit.edu and click “Create” in the top navigation bar. Scratch is completely free, runs in any web browser, and requires no downloads.

Once you click “Create,” the full Scratch editor opens. This is your child’s creative workspace for the entire project.

Before building, explore the editor layout together:
A great animation needs a great stage. Click the backdrop icon at the bottom right of the screen to open the full backdrop library.

For this project, select “Blue Sky.” It gives the Scratch Cat a clear, open stage to walk across. Let your child browse the full library first — choosing the backdrop is their first creative decision as an animator.
Click the Costumes tab at the top of the editor to confirm both costumes are there before you start coding.
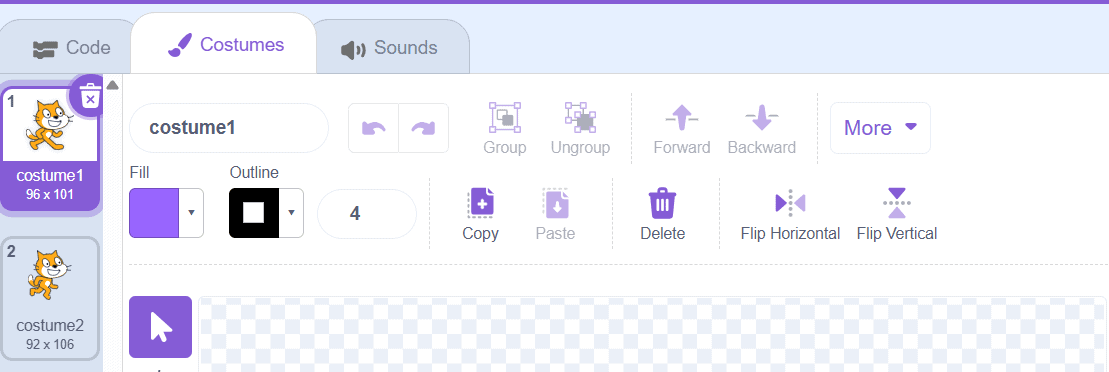
Costumes are the secret engine of Scratch animation. A costume is a different visual appearance for the same sprite. Switching between costumes quickly creates the illusion of movement — exactly like a traditional flip-book.
The Scratch Cat comes with 2 built-in costumes: one with the right leg forward, one with the left. That tiny difference between them is everything — it’s what makes the walking animation come alive.
This costume-switching technique is the same frame-by-frame logic used in professional animation software. If your child enjoys this kind of visual thinking, they might also love exploring how other creative coding projects are structured for beginners.
Every reliable animation begins with a clean starting state. This initialisation block runs every time the green flag is clicked — it positions the sprite off the left edge of the screen, clears any leftover effects, and resets all settings to their defaults.
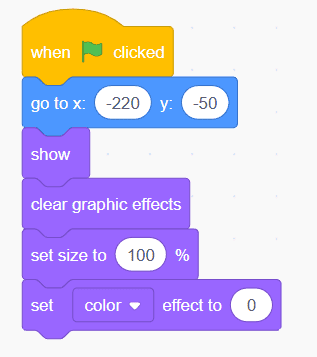
This block stack does 5 essential things every single time the animation starts:
go to x: -220 y: -50 — places the sprite off the left edge of the stage, ready to walk in from outside the frameshow — makes the sprite visible in case it was hidden in a previous runclear graphic effects — removes any colour, ghost, or whirl distortions left from beforeset size to 100% — resets any size changes back to the original defaultset color effect to 0 — returns the colour to its natural, unaltered stateThis is your animation’s safety net. Always build it first — it makes your project reliable and repeatable every time the green flag is clicked.
Now it’s time for the main event. This block stack makes the Scratch Cat walk from the left side of the screen toward the centre — with a smooth, natural walking animation playing as it moves.

Here’s exactly what each block does:
point in direction 90 — faces the sprite to the right before it starts movingrepeat 20 — runs the inner blocks 20 times in a loopmove 10 steps — moves the sprite 10 pixels forward each cycle (20 × 10 = 200 pixels total across the stage)next costume — alternates between the 2 leg positions to create the walking illusionwait 0.08 seconds — slows the loop so the eye can follow the movement naturallyThe wait block is critical. Without it, the animation runs so fast it becomes an invisible blur. 0.08 seconds is the sweet spot — fast enough to feel alive, slow enough to look completely natural.
After the cat walks in, it waves. This block triggers a short animated greeting sequence — the sprite says “Hi” and cycles through its costumes rapidly to create a waving effect.
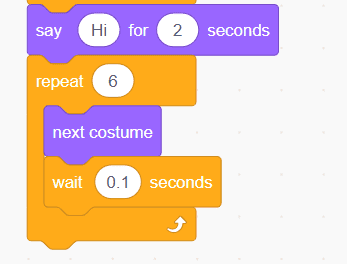
The sprite says “Hi” for 2 seconds while the costume loop plays 6 frames of animation beneath it. The wait 0.1 seconds is slightly slower than the walking animation — this gives the wave a more deliberate, expressive feel compared to the brisk walk-in.
This is storytelling through code. Your child isn’t just animating a character — they’re choreographing a performance, timing a greeting, and deciding how another person experiences their creation.
This kind of sequencing — where one action follows another in a specific order — is exactly what kids practise in structured coding lessons before moving on to more complex projects like games and chatbots.
After the wave, the Scratch Cat introduces itself and gives the player a hint about the keyboard controls that are available.
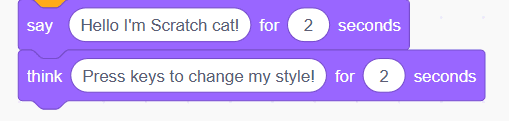
The say block creates a speech bubble — visible to the audience. The think block creates a thought bubble — a private thought that adds personality and character depth. Together, they wrap up the opening animation sequence and invite the player to explore the keyboard controls below.
This is user experience design at its simplest. Your child is thinking about how another person will interact with their project — a mindset that professional developers use every single day.
With the main animation complete, it’s time to add interactivity. These keyboard-triggered blocks let the player take control — changing the sprite’s costume, size, colour, and visual effects in real time. Each block uses event-driven programming: a keypress triggers an immediate response.

Press C and the sprite switches costume instantly. This is event-driven programming in its purest form — one action, one response. It’s the foundational logic behind every interactive game and story ever built in Scratch.

Each press of Up Arrow grows the sprite by 10 units. This gives children a tactile, satisfying sense of how variables change incrementally — a core programming concept wrapped inside a fun, visible interaction.

Press Down Arrow and the sprite shrinks. Used together with the Up Arrow, these 2 blocks teach children that the same concept (changing size) can work in 2 opposite directions — a clean, intuitive introduction to positive and negative values in programming.

Press 1 to cycle the sprite’s colour forward through the hue spectrum — orange, red, purple, blue, green, and back to yellow. Press 2 to reverse through the same spectrum. Full creative colour control, handed directly to your child. This is also a brilliant introduction to the concept of additive and subtractive values in code.
This is where the animation gets a little magical. Scratch has 7 built-in graphic effects — and these 2 keys unlock 2 of the most dramatic ones.
Option A: Ghost Fade (S Key)

Each press of S makes the sprite 15% more transparent. Press it enough times and the Scratch Cat fades away entirely. This is a brilliant, visual way to introduce kids to the concept of opacity — a core skill in graphic design, animation, and UI development.
Option B: Whirl / Sparkle Effect (Spacebar)

Every Spacebar press twists the sprite by 15 more degrees of whirl distortion. The effect builds dramatically with repeated presses — the Scratch Cat contorts into a spinning vortex that kids absolutely love discovering. Pairing ghost and whirl together creates a disappearing magic trick effect that makes young coders feel like genuine animators.
Every great animation needs a reset function. Without one, effects stack up across runs, the sprite drifts off screen, and the project becomes unpredictable. Building a reset function is how beginner coders start thinking like engineers.

Press R and everything snaps back instantly:
clear graphic effects — removes all colour, ghost, and whirl distortions in one goset size to 100% — undoes any growing or shrinking from the arrow keysswitch costume to costume1 — returns the sprite to its original default appearancego to x: 0 y: -50 — moves the sprite back to a clean, centred position on stageTeaching children to build a reset function teaches them to think about failure before it happens — to make their projects not just functional, but robust. That debugging mindset is something kids develop naturally when they work on real projects rather than isolated exercises.
Find out how ItsMyBot builds this engineering mindset in children through personalised, industry-level courses at itsmybot.com/coding-courses-for-kids.
This is the celebration finale — and the most visually impressive block in the entire project. When the player clicks directly on the Scratch Cat, it breaks into an animated dance combining spinning, costume changes, colour shifting, and precise timing all at once.

Here’s what this block stack delivers in a single click:
when this sprite clicked — triggers the entire dance sequence the moment the player clicks the catrepeat 10 — runs the inner dance blocks 10 times in a smooth loopturn 15 degrees — rotates the sprite 15° clockwise each cycle (10 × 15° = a full 150° spin total)next costume — cycles the costume each frame so the cat appears to move while spinningchange color effect by 25 — shifts the colour with each cycle, creating a rainbow spin effectwait 0.05 seconds — sets the dance speed — fast enough to look energetic, smooth enough to followThis single block stack combines motion, costume switching, visual effects, and timing — all 4 pillars of Scratch animation in one elegant, joyful sequence. It’s the kind of moment that makes a child’s face light up with genuine pride in what they’ve built.
Even enthusiastic young coders run into the same stumbling blocks. Here are the most common Scratch animation mistakes — and exactly how to fix them:
❌ Mistake 1: Skipping the Green Flag initialisation block
❌ Mistake 2: Forgetting the wait block inside animation loops
wait 0.08 seconds inside every costume-switching loop. Adjust the value to speed up or slow down the animation.❌ Mistake 3: Not building a reset function
❌ Mistake 4: Stacking effects without an off switch
clear graphic effects block inside your R-key reset .❌ Mistake 5: Choosing a backdrop after coding the motion
Use the repeat block with move 10 steps, next costume, and wait 0.08 seconds inside it. Point the sprite in direction 90 before the loop so it faces right. The next costume block alternates between leg positions to create the walking illusion.
A costume is a different visual appearance for the same sprite. When you switch between costumes quickly using the next costume block inside a loop, the sprite appears to move — exactly like a traditional flip-book animation. The Scratch Cat has 2 built-in costumes that create a natural walking animation when cycled.
Use the change [effect] by block inside an event trigger. Scratch includes colour, ghost, whirl, fisheye, pixelate, mosaic, and brightness effects. Trigger them with keyboard keys — ghost with S , whirl with Spacebar , and colour with keys 1 and 2 .
Build the R-key reset block that includes: clear graphic effects, set size to 100%, switch costume to costume1, and go to x: 0 y: -50. One keypress restores every setting to its original state instantly.
Yes. Scratch is completely free and available at scratch.mit.edu. It runs in any web browser with no downloads required. It’s developed and maintained by the MIT Media Lab as a nonprofit educational platform for children worldwide.
Scratch is designed for children aged 8 and above, though many 5–7 year olds learn it successfully with parental guidance. The block-based drag-and-drop interface requires no typing, making it highly accessible for young learners.
A complete beginner can build this full project — walk-in animation, wave, hello, all keyboard controls, and dance mode — in approximately 45–60 minutes. With an experienced mentor guiding the session, children often finish their first interactive animation in a single lesson and are immediately excited to build the next one.
After this, children typically move into Scratch game design, where they apply the same block logic to build scoring, lives, and collision detection. From there, the natural next step is Python — where the same concepts they learned here (loops, events, variables) show up again, just written instead of dragged.
Learning how to make animation in Scratch is about so much more than moving a cat across a screen. Every block your child snaps together builds logical thinking, creative confidence, and real-world coding skills that open doors to future-ready careers in technology, design, and beyond.
Your child’s first Scratch animation is just the beginning. The skills they’ve built here — event-driven thinking, loops, debugging, creative sequencing — are the same skills used by professional developers every single day. The next step might be building their first Scratch game, or exploring how these same ideas translate into Python and beyond.
At ItsMyBot, we turn that spark into mastery. Explore our personalised, industry-level coding courses for kids aged 5–15 at itsmybot.com/courses.


