Creating your own trivia game can be both fun and educational. Many beginners struggle with where to start, feeling overwhelmed by the coding process. This guide will help you overcome those challenges by providing a clear, detailed roadmap to making a trivia game on Scratch. Let’s turn your ideas into an engaging game!
What is a Trivia Game in Scratch?
A trivia game in Scratch is an interactive quiz where players answer questions to earn points. Scratch provides a beginner-friendly platform where you can design both simple and complex trivia games. Whether it’s about general knowledge, specific topics, or fun facts, you can create a game that challenges and entertains players of all ages.
Key Features of a Trivia Game on Scratch
What makes a trivia game engaging? Here are the essential features to include:
- Question and Answer Interaction: Players receive questions and choose answers from multiple options.
- Score Tracking: Keep track of the player’s score as they answer questions correctly.
- Feedback for Answers: Provide immediate feedback for correct or incorrect answers to enhance learning.
- Timers and Bonus Rounds: Add a countdown timer or bonus questions to increase difficulty and excitement.
Why Create a Trivia Game in Scratch?
Why should you choose Scratch for your trivia game?
- Encourages Logical Thinking and Creativity: Building a game enhances problem-solving skills and sparks creativity.
- Learn Essential Scratch Blocks: Utilize blocks like If-Then and variables, foundational for coding.
- Fun and Shareable End Result: Create a game you can proudly share with friends and the Scratch community, making learning enjoyable.
Tools and Resources Needed
Ready to start? Gather these tools:
- A Scratch Account: Sign up at Scratch to access the platform.
- Trivia Questions and Answers: Prepare a list of questions and their corresponding answers.
- Visual Assets: Use or create sprites and backdrops. Free resources are available on platforms like OpenGameArt or within Scratch’s own library.
Step-by-Step Guide to Creating a Trivia Game
Follow these detailed steps to build your own trivia game on Scratch:
Step 1: Designing Your Trivia Game
How do you begin designing?
- Brainstorm the Theme and Topic: Decide whether your trivia game will focus on general knowledge, science, history, or a fun niche like superheroes. Choosing a specific theme helps in selecting relevant questions and designing appropriate visuals, making the game more cohesive and engaging for players.
- Select Age-Appropriate Questions: Ensure questions match the intended audience’s knowledge level. For younger players, opt for simpler, more straightforward questions, while older players might enjoy more challenging and complex topics.
- Sketch a Rough Storyboard: Plan the game flow, including how questions will appear and how players will interact. A storyboard helps visualize each stage of the game, from the start screen to the end, ensuring a smooth and logical progression throughout the gameplay.
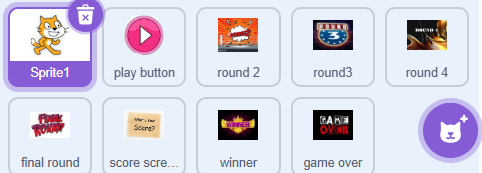
Step 2: Adding Sprites and Backdrops
How do you set up the visual elements?
- Choose or Create Sprites: Select sprites for the quiz master and answer buttons. Customize them to fit your game’s theme by editing their costumes or creating entirely new sprites using Scratch’s built-in editor or external graphic tools.
- Select Backdrops: Pick or design backdrops that change with each question to keep the game visually engaging. Different backgrounds can signify various levels, categories, or simply add variety to maintain player interest throughout the game.
Step 3: Coding the Sprites
What’s next after visuals?
- Code the Quiz Master Sprite:
This sprite will give the initial instructions.
Create a script for it to say something like:
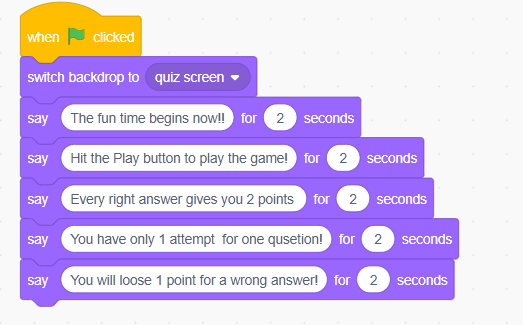
when green flag clicked

say "Welcome to the Quiz! Click the play button to start."
- Code the Play Button Sprite:
Add a sprite for the play button.
When clicked, it starts the game by switching to the first question
Show the First Question:
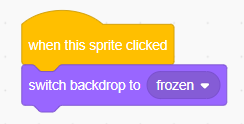
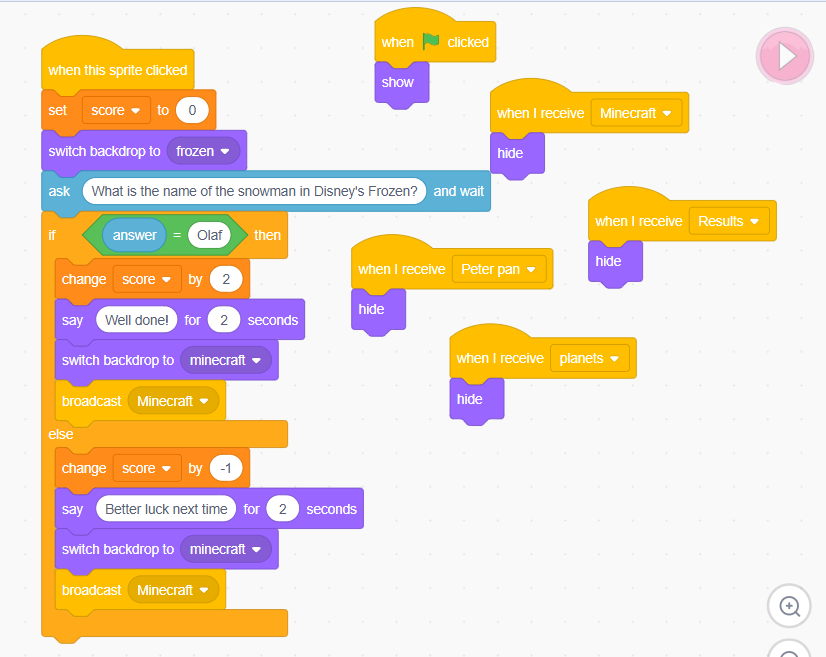
<when this sprite clicked>
>Switch backdrop> to Round 1(Question 1)
Ask<question>
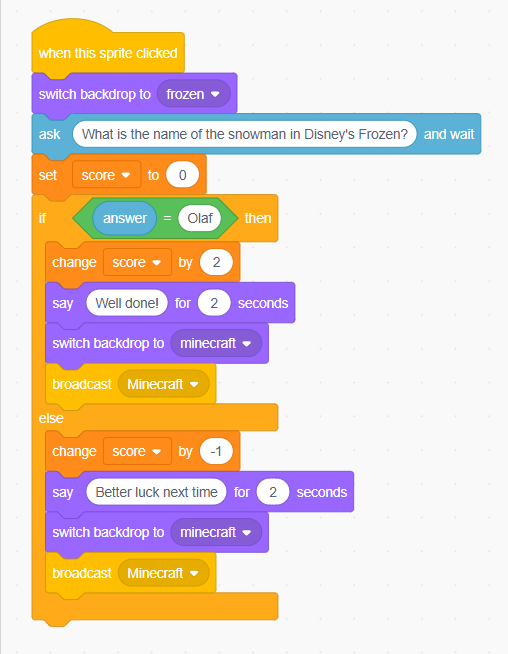
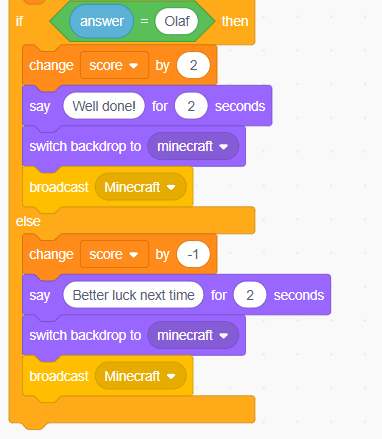
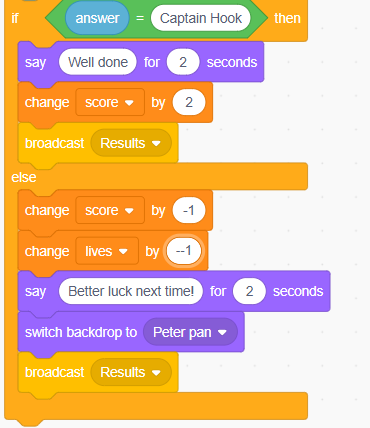
- Checking the correctness of answer:
Check if answer is correct or not using< if then else>
Display appropriate messages using< say block>
- Handle Answer Choices for Question 1:
Create a Scoring System: Use variables to keep track of the player’s score. Initialize the score at the start of the game and increment it each time the player answers a question correctly. Display the score prominently on the screen to keep players motivated.
Add Variables:
You can create buttons or sprites for the answer options. If the player clicks the correct answer, increase the score by 2; otherwise, decrease by 1.
Score Variable:
- Create a variable called Score to track the player’s performance.
- Initialize it at the start of the game:
when green flag clicked
set [Score v] to [0]
change variable by 2
- Provide immediate feedback for correct and incorrect answers
Show messages for correct and incorrect answers to enhance learning and engagement. For correct answers, display encouraging messages or animations, and for incorrect answers, provide gentle corrections or explanations to help players understand their mistakes.
- Proceed to the Next Question:
When the player finishes answering, broadcast a message to switch to the next question
switch backdrop to [Question 2 v]
broadcast [show_question_2 v]
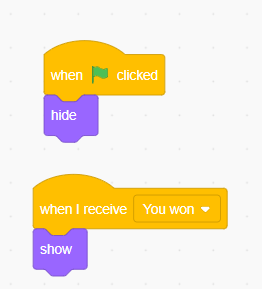
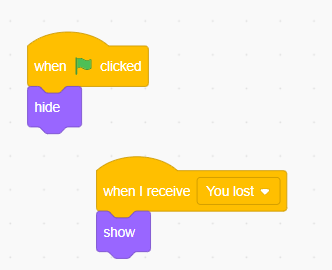
- Hide and show the characters wherever necessary:
when flag clicked< show>
when I receive <hide>
- Repeat for All 5 Questions:
Follow the same structure for questions 2 through 5
Use broadcast to switch between backdrops and show the corresponding question.
For example:
when I receive [show_question_2 v]
switch backdrop to [Question 2 v]
show
say “Which animal is known as the king of the jungle?” for 2 seconds
Add correct and incorrect answer blocks with score adjustments for each question.
- Code for game over screen:
Adding Lives and Decreasing on Wrong Answers(Optional)
Step 4: Create a ‘Lives’ Variable
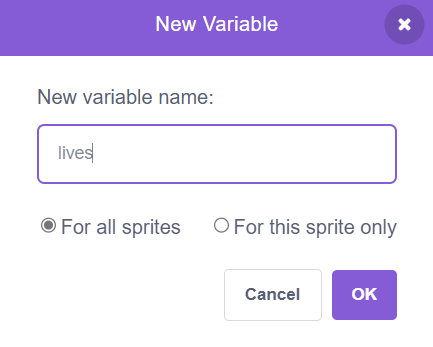
Add a Lives Variable:
- Go to the Variables section.
- Click on “Make a Variable” and name it Lives.
- This variable will store the number of attempts (lives) the player has.
Initialize Lives:
At the start of the game, set the player’s lives to a certain number (e.g., 3 or 5):
when green flag clicked
set [Lives v] to [3]
Decrease Lives on Wrong Answer
Set Up the Wrong Answer Logic:
For each question sprite, when the player selects an incorrect answer, decrease the lives by 1:
when this sprite clicked
change [Lives v] by [-1]
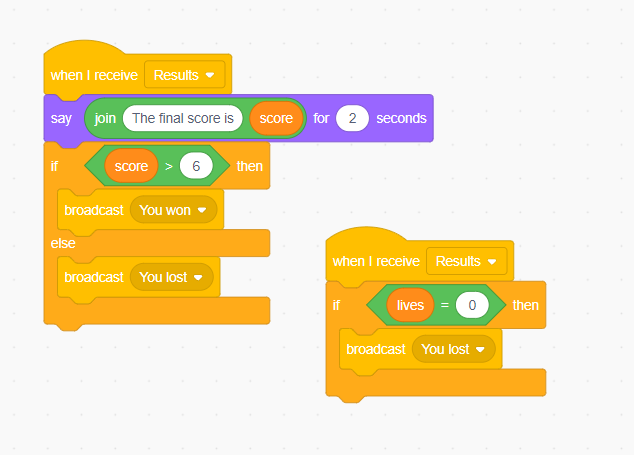
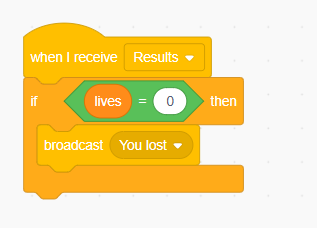
Check if Lives are Zero:
After decreasing the lives, you need to check if the player has run out of lives. If so, broadcast a message to show the Game Over screen:
if <(Lives) = [0]>
then broadcast [game_over v]
else broadcast [next_question v]
This logic ensures that the game either moves to the next question if there are remaining lives or ends the game if lives reach zero.
Show the Game Over Screen
Game Over Broadcast:
- When the player runs out of lives (Lives = 0), the game_over message is broadcast.
- Add this script to switch the backdrop to the Game Over screen when the player loses all lives:
when I receive [game_over v]
switch backdrop to [Game Over v]
say “Game Over! You’ve run out of lives.” for 2 seconds
Stop the Game:
After showing the Game Over message, you can stop the game by adding:
stop [all v]
Step 5: Display the Lives on the Screen (Optional)
Show Lives on the Screen:
- If you want to show the number of lives the player has on the screen, make sure to check the box next to the Lives variable in the Variables section. This will display the lives on the stage.
Visual Feedback for Lives:
- You can add visual feedback, like hearts or icons, that decrease in number when the player loses a life. Create heart sprites, hide them when a life is lost, and display them based on the Lives variable.
Step 6: Creating a Timer (Optional)
Should you add a timer?
- Benefits of a Timer: Adds a challenge and urgency, making the game more exciting. A timer can encourage players to think quickly and adds an element of competition, enhancing the overall gaming experience.
- Coding a Countdown Timer: Utilize Scratch blocks to implement a countdown that pressures players to answer quickly. Set the timer at the beginning of each question and decrease it as time passes, triggering events when the time runs out, such as moving to the next question or ending the game.
Step 7: Create a ‘Timer’ Variable
- Add a Timer Variable:
- Go to the Variables section.
- Click on “Make a Variable” and name it Timer.
- This will store the countdown time for each question.
Step 8: Set the Timer for Each Question
- Initialize the Timer:
- Before each question starts, set the timer to a specific amount of time (e.g., 10 seconds)
when I receive [start_question_1 v] // This is the message for the first question set [Timer v] to [10] // Set the timer to 10 seconds
Countdown Timer:
- Use a repeat loop to decrease the timer by 1 each second. After the countdown ends, broadcast a message indicating time’s up.
repeat until <(Timer) = [0]>
change [Timer v] by [-1]
wait 1 second
Check for Timer End:
After the countdown, if the timer reaches 0 and the player hasn’t answered, they lose a life and move to the next question.
if <(Timer) = [0]> then
broadcast [time_up v]
Step 9: Enhancing the Game with Custom Features
How can you make your game stand out?
- Add Sound Effects and Music: Incorporate audio to make the game more immersive. Use sound effects for correct and incorrect answers, background music to set the mood, and audio cues to signal transitions between questions.
- Design Bonus Rounds: Include special questions that offer higher points for added excitement. Bonus rounds can feature more challenging questions or unique gameplay mechanics, rewarding players who excel in the main game.
- Use Advanced Scratch Blocks: Implement AI-driven questions or other complex features to elevate your game. Utilize advanced programming techniques like cloning sprites, handling user input dynamically, or integrating external data sources to create a more sophisticated and engaging trivia experience.
Troubleshooting Common Issues
Facing problems? Here’s how to fix them:
- Questions Not Transitioning Properly: Check your broadcast blocks to ensure they’re connected correctly.
- Score Not Updating: Verify that your variable changes are correctly registered in the code.
- Timer Glitches: Look for common pitfalls in your timer code and make necessary adjustments to ensure smooth countdowns.
Tips for Making the Game Engaging
How to keep players hooked?
- Use Fun Themes: Themes like space, animals, or superheroes can make the game more appealing.
- Add Colorful Animations and Sound Effects: Enhance visual and auditory elements to create a lively experience.
- Include Variety in Question Types: Mix multiple-choice, true/false, and open-ended questions to keep the game interactive and interesting.
Sharing and Publishing Your Game
Ready to showcase your creation?
- Test Your Game: Play through your game multiple times and gather feedback to make improvements.
- Share on the Scratch Community: Publish your game on Scratch and engage with other users by sharing your project.
- Write a Catchy Description: Craft an appealing description that highlights your game’s unique features to attract players.
FAQs About Creating a Trivia Game in Scratch
Got questions? Here are some answers:
- What age group is this project suitable for? This project is ideal for kids aged 8 and up, as well as beginners of all ages interested in learning to code.
- Can I create this game without prior coding experience? Absolutely! Scratch is designed for beginners, and this guide will walk you through each step.
- How can I make the game mobile-friendly? While Scratch primarily runs on desktop browsers, you can optimize your game’s layout and controls for better mobile compatibility.
Conclusion
Creating a trivia game on Scratch is a rewarding project that combines creativity, logic, and fun. By following this step-by-step guide, you’ve learned how to design, code, and enhance your game, making it engaging and enjoyable for players. Don’t stop here—experiment with new features and build even more complex games. Share your creation with the Scratch community and watch your coding skills grow with each project!
By following this comprehensive guide, you’re well on your way to creating an impressive trivia game on Scratch. Embrace the process, enjoy the learning journey, and let your creativity shine!
Want your child to go further? Explore ItsMyBot’s Little Coder — structured coding courses designed for kids!