Are you eager to bring your creative ideas to life but tired of dull coding exercises? It’s frustrating when your imagination feels limited by uninspiring projects. What if you could design a fun, interactive doll house game on Scratch that not only sparks joy but also hones your programming skills? Imagine crafting a virtual dollhouse where you can arrange furniture, dress up dolls, and create stories—all while learning to code. Let’s embark on this exciting journey together and unlock a world where creativity meets technology!
Table of Contents
What You Need Before Starting
Before diving into the creation of your doll house game, it’s essential to gather all the necessary tools and resources. This preparation ensures a smooth and enjoyable experience as you bring your imaginative ideas to life.
A Free Scratch Account: Sign up at the Scratch website to access the platform’s features and save your projects online. Having an account allows you to share your creations with the Scratch community and receive valuable feedback from other users, enhancing your learning experience.
Understanding the Scratch Interface:
Stage: The area where your game plays out and sprites interact. It’s the canvas of your virtual world, where all the action happens and scenes unfold.
Sprites: The characters or objects in your game, such as dolls, furniture, or interactive items. They are the building blocks of your game, bringing life and interactivity to your project.
Code Blocks: The building blocks of your program, categorized into motion, looks, sound, events, control, and more. Understanding how to use these blocks is crucial for creating interactive elements and bringing functionality to your game.
Tools and Resources:
Decide whether to use pre-made doll house images from the Scratch library or create your own using Scratch’s sprite editor. Custom images allow for a more personalized game experience and can make your project stand out.
Familiarize yourself with basic code blocks like event, motion, and control blocks to make your game interactive. This knowledge will help you implement features like dragging sprites and responding to user input, essential for an engaging game.
By ensuring you have all these components ready, you’re setting yourself up for a successful and enjoyable coding adventure. Now, let’s delve into the step-by-step guide to bring your doll house game to life!
Step-by-Step Guide to Making a Doll House Game on Scratch
Creating a doll house game on Scratch is an exciting project that combines creativity with coding. Let’s break down the process into detailed steps to make it easy for you to follow.
Step 1: Setting Up the Background
The background sets the scene for your doll house game, so it’s essential to make it appealing and functional.
Choose or Create a Background:
Click on the “Stage” area in Scratch to access backdrop settings. This is where you’ll set the overall environment of your game.
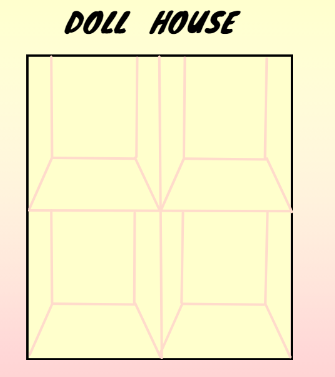
Select “Backdrops” and choose a pre-made backdrop that resembles a dollhouse interior, or create your own using the editor to add personal touches and match your vision.
Design Multiple Rooms: Divide the backdrop into different rooms such as a living room, bedroom, kitchen, and bathroom. This adds variety and makes the game more engaging for players as they explore different areas.
Add Details and Interactive Elements:
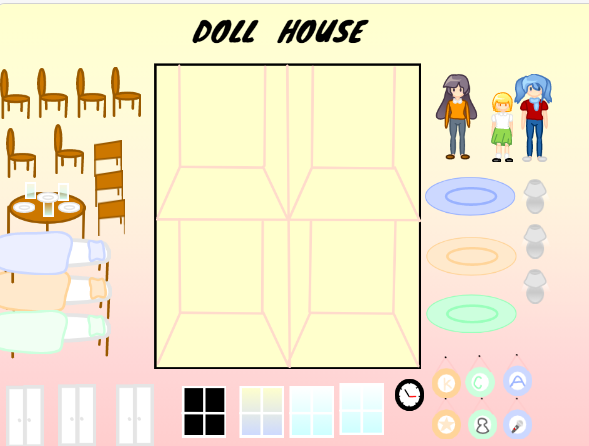
Decorate Each Room: Include elements like windows with curtains, patterned wallpapers, carpets, and light fixtures to enhance visual appeal and make each room unique.
Plan Furniture Placement: Decide where furniture items will go and ensure there’s enough space for dolls to move around. This planning helps in organizing your game effectively and ensures a better user experience.
Enhance Visual Depth:
Use Shadows and Highlights: Add shadows to furniture and dolls to give a three-dimensional effect.
Layering Objects: Plan the layering of objects to create a sense of depth, making your dollhouse look more realistic.
Planning where interactive elements like furniture and dolls will be placed helps in organizing your game effectively and ensures a better user experience.
Step 2: Adding Doll and Furniture Sprites
Sprites are the interactive objects in your game, representing the dolls and furniture.
Select Sprites:
Click on “Choose a Sprite” at the bottom of the Scratch interface to add new sprites to your project.
Pick from Scratch’s Library: Browse through categories like “People,” “Things,” and “Fantasy” to find suitable sprites that fit your game’s theme.
Draw Your Own Sprites: Use the Paint Editor to create unique dolls and furniture, allowing for unlimited creativity and personalization.
Customize Sprites:
Alter Appearance: Use tools like the paintbrush, fill tool, and vector shapes to modify colors, add patterns, or change shapes, giving your sprites a unique look.
Create Multiple Costumes: Design different outfits or poses for your dolls by adding new costumes within the sprite. This allows for animations and variety, making your game more dynamic.
Add Details: Include facial expressions, accessories, or textures to make your sprites more engaging and visually appealing.
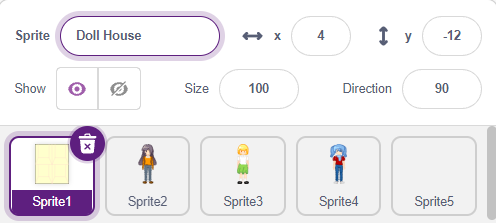
Name Your Sprites Appropriately: Give each sprite a clear name like “Doll_Main,” “Sofa_LivingRoom,” or “Kitchen_Table” to keep your project organized and make coding easier.
Personalizing your sprites makes your game unique and can enhance the player’s connection to the game.
Step 3: Coding Drag-and-Drop Interactions
Now that you have your sprites and background, it’s time to make them interactive.
Enable Draggable Sprites:
Click on each sprite to access its settings and ensure the correct sprite is selected.
Check the “Draggable” option in the sprite’s properties panel to allow users to move it with the mouse during gameplay, enabling an intuitive drag-and-drop feature.
Add Movement Code:
Go to the Code tab for each sprite to start scripting behaviors.
Use the “when green flag clicked” block to start your script, ensuring that the code runs when the game begins.
Add “set draggable to true” to ensure sprites can be moved when the game starts, reinforcing the draggable property.
Implement Boundaries:
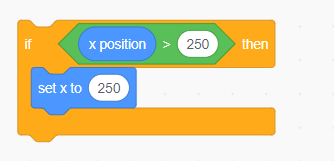
Use “if on edge, bounce” or coordinate checks to prevent sprites from being dragged off the stage, keeping them within the visible play area.
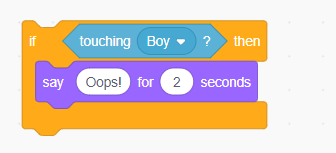
Example: Use an “if then” block to check if the sprite’s x or y position is beyond certain limits and reposition it if necessary.
Manage Sprite Layering:
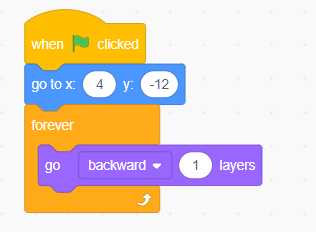
Use the “go to front layer” or “go backward [number] layers” blocks to control the stacking order of sprites, ensuring proper visual layering.
Example: To make a doll appear behind a couch, use “go backward 1 layers” when the doll is placed near the couch, creating a realistic depth effect.
Enhance Interactivity:
Snap to Grid: Implement code that snaps furniture to specific locations, making placement easier and more precise.
Collision Detection: Use sensing blocks to prevent sprites from overlapping unnaturally, enhancing realism.
Layering and movement coding are crucial for creating a realistic and seamless interaction within your game.
Step 4: Adding Sound and Music
Sound effects and background music significantly enhance the user experience.
Add Background Music:
Click on the Stage to access its scripts and sounds, as background music is typically controlled from the stage.
Navigate to the “Sounds” tab and choose a cheerful track from the Scratch library or upload your own to match the mood of your game.
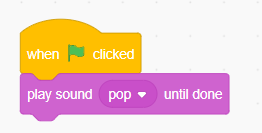
In the Code tab, use:
“when green flag clicked” to start the music when the game begins.
“forever” loop containing:
“play sound [music] until done” to keep the music playing continuously.
Include Sound Effects:
For each sprite, click on it and go to the “Sounds” tab to add sound effects relevant to that sprite.
Select Appropriate Sounds: Choose sounds that match actions, like a “click” when an item is selected or a “whoosh” when a doll moves.
Use code:
“when this sprite clicked” to trigger the sound effect upon interaction.
“play sound [effect]” to play the selected sound.
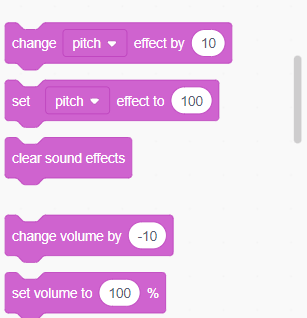
Adjust Volume and Quality:
Use the “set volume to [number]%” block to balance background music and sound effects, ensuring neither is overpowering.
Fade In/Out Effects: Implement volume changes for a smoother audio experience, like fading out music when the game ends.
Adding audio elements makes your game more engaging and can significantly improve the player’s experience.
Step 5: Testing Your DollHouse Game
Testing is a critical step to ensure that your game runs smoothly.
Test Interactions:
Click the green flag to start your game and reset all scripts.
Drag and Drop Sprites: Move dolls and furniture around to ensure they are draggable and respond correctly to user input.
Check Layering: Verify that sprites appear in front of or behind others as intended, ensuring visual consistency.
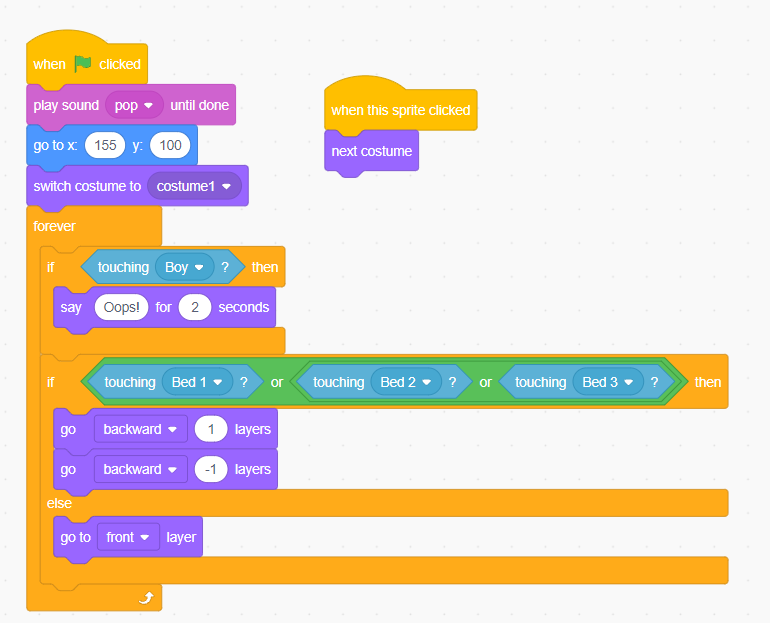
Costume changes: When the doll sprites are clicked, their costume changes to sitting,sleeping or standing positions
Code for Dollhouse:
Code for doll sprites:
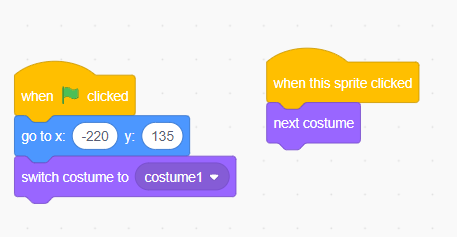
Code for Furniture:
Code for doors:
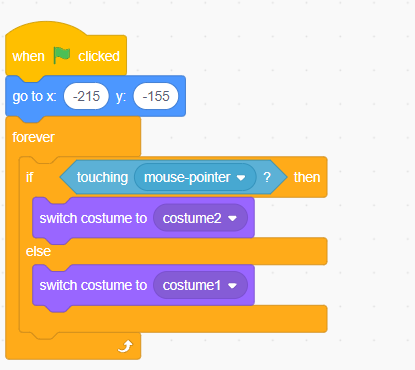
Code for windows:
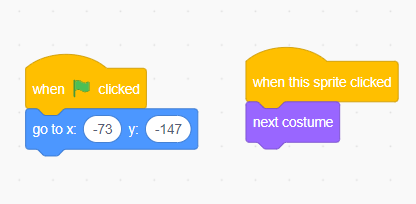
Code for room decorations, wall hangings, and clock:
Debug Issues:
Sprites Not Moving: Ensure the draggable option is enabled and that movement code is correctly implemented without conflicting scripts.
Sound Problems: Verify that the correct sounds are selected in the code and that the volume is set appropriately; check for typos in sound names.
Visual Glitches: Check for any overlapping sprites or graphical errors, and adjust layering or positioning as needed.
Get Feedback:
Have friends or family play your game to identify issues you might have overlooked. Observing others can reveal usability problems.
Ask for Specific Feedback: Inquire about the game’s ease of use, enjoyment level, and any confusing elements.
Iterate and Improve:
Based on the feedback, make necessary adjustments to enhance the game’s functionality and user experience.
Thorough testing ensures that players have a smooth and enjoyable experience when playing your game.
Key Features to Enhance the Game
To make your doll house game stand out, consider adding advanced features that enhance gameplay.
Add a “Reset” Button:
Create a Reset Sprite: Design a button labeled “Reset” or use an icon that represents restarting, placing it in a convenient location on the screen.
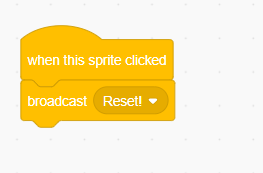
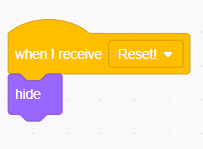
Code the Reset Function to hide the dolls when reset button is clicked:
Use “when this sprite clicked” to trigger the reset action.
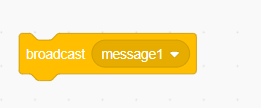
Broadcast a message like “reset” to all sprites using “broadcast [reset]”.
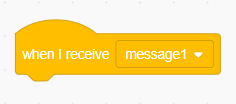
On each draggable sprite, use “when I receive [reset]” “hide” the character
Code for Reset button:
Add in the doll sprites:
Confirm Reset: Optionally, add a confirmation prompt to prevent accidental resets.
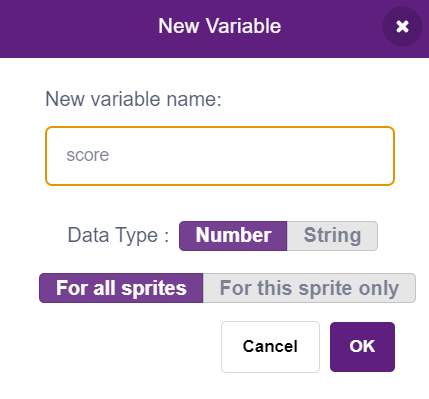
Include a Scoreboard:
Create a Variable: Use the “Make a Variable” option to create a score that tracks player achievements.
Define Scoring Criteria:
Decide how players earn points, such as placing items in correct locations, completing room setups, or finding hidden objects.
Example: Award 10 points when a player correctly places a piece of furniture in its designated spot.
Update the Score:
Use “change [score] by [number]” when a player performs a scoring action.
Display the score on the screen using a variable monitor, customizing its appearance for better integration with your game’s design.
Allow House Customization:
Interactive Backdrops: Enable players to change room themes by clicking on walls or using buttons, offering a personalized experience.
Multiple Themes:
Create different backdrops or costumes for rooms, such as modern, classic, or fantasy styles.
Implement Switching Mechanism:
Use “when this sprite clicked” to change backdrops with “switch backdrop to [ ]”, allowing players to cycle through available themes.
Customizable Furniture:
Allow players to change furniture colors or styles by clicking on them, using “next costume” blocks.
Add Mini-Games or Challenges:
Introduce small tasks or puzzles within the dollhouse, like finding hidden items or completing timed challenges to keep gameplay interesting.
Incorporating these features provides a richer experience that can appeal to a wider audience and keeps players engaged for longer periods.
Sharing and Publishing Your Game
After putting in all that hard work, it’s time to share your creation with the world!
Share on Scratch:
Click the “Share” button on your project’s page to make it public and accessible to other users.
Add a Compelling Description:
Write about the game’s features, how to play, and what makes it unique.
Include screenshots or a brief introduction to entice potential players.
Include Relevant Tags:
Use tags like “dollhouse,” “game,” “creative,” “kids,” and “Scratch” to help others find your project when searching.
Encourage Remixing:
Allow others to remix your project, fostering collaboration and creativity within the community.
Provide Notes and Credits:
Mention any inspirations, resources, or collaborators.
Outline any guidelines for remixing to respect your original work.
Promote on Social Media:
Share Links:
Post your game on platforms like Facebook, Twitter, Instagram, or Reddit.
Use relevant hashtags to reach a broader audience.
Use Visuals:
Include eye-catching screenshots or a short video showcasing gameplay to attract attention and generate interest.
Engage with the Community:
Join groups or forums related to Scratch, coding, or game development to share your project and connect with like-minded individuals.
Gather Feedback:
Encourage players to leave comments or reviews.
Use this feedback to make improvements and updates to your game.
Engaging with players who try your game provides valuable feedback that can help you improve and encourages a supportive community around your work.
Tips and Tricks for Creating Better Doll House Games
Enhance your game by considering design and user experience.
Keep It Simple and User-Friendly:
Intuitive Controls:
Ensure players can easily navigate the game without confusion.
Use clear icons and buttons for actions like resetting or changing themes.
Clear Instructions:
Provide guidance at the start of the game or include a “Help” section.
Use simple language and visuals to explain how to play.
Focus on Visual Appeal:
Consistent Design Elements:
Use matching furniture styles and harmonious color schemes to create a cohesive look throughout the game.
Maintain consistent art styles for sprites and backgrounds.
Attention to Detail:
Add small touches like shadows, textures, and animations to make your game more engaging.
Use effects like fading or transitions when changing scenes or themes.
Gather Feedback:
User Testing:
Have different people play your game and provide honest feedback on gameplay, design, and enjoyment.
Implement Suggestions:
Be open to making changes that enhance gameplay and user satisfaction.
Prioritize improvements based on common feedback.
Stay Organized:
Comment Your Code:
Use comments to explain what different scripts do, making it easier to update or debug later.
Organize code into sections for readability.
Organize Sprites and Backdrops:
Keep your project’s assets tidy by grouping related sprites and naming them clearly for efficient management.
Explore Advanced Features:
Animations:
Use costumes and scripts to animate sprites, adding life to your game.
Create walking animations for dolls or moving parts for furniture.
Interactivity:
Include clickable objects that trigger events or mini-games within your dollhouse.
Use variables and conditions to create more complex interactions.
By incorporating these tips, you’ll create a better game and develop your skills as a programmer and designer.
Why Making a Doll House Game on Scratch is Great for Kids
Engaging in this project offers numerous benefits, especially for young learners.
Enhances Creativity and Storytelling:
World-Building:
Kids craft their own worlds, characters, and narratives, fostering imagination and self-expression.
They can create unique stories and scenarios, enhancing their storytelling abilities.
Personalized Play:
Allows for endless customization, letting kids make the game truly their own and increasing engagement.
Develops Problem-Solving Skills:
Logical Thinking:
Coding challenges encourage kids to think logically and systematically to solve problems.
They learn to break down complex tasks into manageable steps.
Perseverance:
Overcoming obstacles in coding teaches resilience and determination, valuable life skills.
Introduces Programming Concepts:
Fundamental Skills:
Grasp basic concepts like sequences, loops, conditionals, and events in an engaging way.
These foundational skills are crucial for future learning in technology fields.
Hands-On Learning:
Interactive projects make abstract concepts concrete, aiding understanding and retention.
Boosts Confidence:
Sense of Achievement:
Completing a project builds self-esteem and pride in their work, motivating further learning.
Recognition:
Sharing their game and receiving positive feedback reinforces their confidence and encourages continued creativity.
Encourages Collaboration:
Teamwork:
Sharing and remixing projects teach kids the value of working together and appreciating different perspectives.
They learn to give and receive constructive feedback.
Community Engagement:
Participating in the Scratch community fosters a sense of belonging and exposes them to diverse ideas.
By engaging in such projects, kids acquire skills that benefit them throughout their education and future careers, all while having fun.
Conclusion
Embarking on the journey to create a doll house game on Scratch is both rewarding and educational. From setting up the background to adding intricate features, you’ve learned how to combine creativity with coding to build an engaging game. This project not only enhances your programming skills but also allows you to express your artistic side.
Remember, the possibilities are endless. Don’t hesitate to experiment with new ideas or features. The more you explore, the more you’ll discover what you can achieve with Scratch. Whether you’re a beginner or have some coding experience, this project offers a fun way to develop your skills.
Ready to unleash your creativity and coding skills? Start your own dollhouse game on Scratch today and share your unique creation with the world. Join the vibrant community of Scratch creators and inspire others with your innovative designs. Don’t forget to share your game in the comments below—we can’t wait to see what you’ve built!
If you want to play a doll house game on Scratch, visit this project: Doll House Game. Experience firsthand how interactive and fun a Scratch doll house game can be!
Want your child to go further? Explore ItsMyBot’s Little Coder — structured coding courses designed for kids!
Empowering children with the right skills today enables them to drive innovation tomorrow. Join us on this exciting journey, and let's unlock the boundless potential within every child.