Reading Time: 12 mins
What: A step-by-step guide to building your own remote controlled robot using affordable components and beginner-friendly programming.
Who: Kids, students, hobbyists, and parents looking to explore robotics and RC technology.
Why: Building RC robots develops problem-solving skills, STEM knowledge, and hands-on engineering experience.
When: Start today with basic components; complete your first robot in 2-4 hours.
How: Follow our proven method using microcontrollers, sensors, and remote control technology to create functional robotic projects.
Have you ever watched a remote controlled car zip across the floor and wondered how it works? Or perhaps your child has expressed interest in building their own robotic creations? You’re not alone. The remote controlled robot market is expected to grow by 12.4% annually through 2030, and for good reason.
Without proper guidance, building an RC robot can feel overwhelming—wasted money on incompatible parts, frustrating failures, and abandoned projects. But here’s the exciting part: with the right approach and components, you can build a functional remote controlled robot in just a few hours, gaining invaluable skills that form the foundation of modern engineering and robotics education.
This comprehensive guide walks you through everything from selecting components to programming your first autonomous behaviors, ensuring your robotics journey starts strong.
A remote controlled robot is an automated device that responds to wireless commands sent from a handheld transmitter or smartphone. Unlike autonomous robots that make independent decisions, RC robots rely on human operators to control movement, actions, and functions.
Modern remote controlled robots combine three essential elements:
The beauty of RC robotics lies in its versatility. You can build anything from simple two-wheeled cars to complex multi-functional robots with sensor integration—making it perfect for learners at any skill level.
Before diving into construction, understanding your component kit ensures success. Here’s what you’ll need:

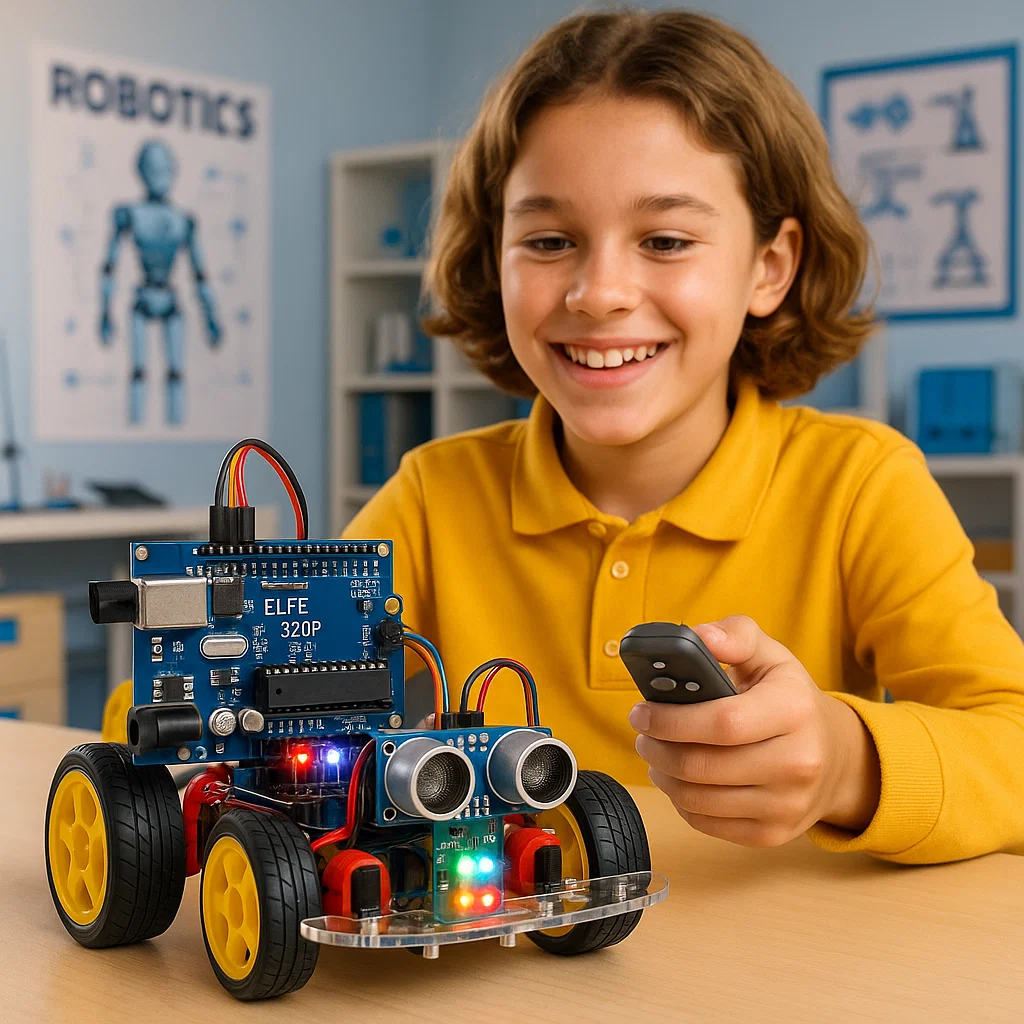
Microcontroller (ELF 328P Mainboard): The brain of your robot that processes commands and controls all functions. This Arduino-compatible board offers excellent performance for beginners while supporting advanced features as you progress.
Remote Control System: Includes both the transmitter (handheld remote) and receiver module that communicates with your robot. Modern systems operate on 2.4GHz frequency for interference-free operation.
Wi-Fi Connectivity Module: Enables smartphone control and internet connectivity, allowing you to program remote operation through mobile apps or web interfaces.
Your robotics kit should include multiple sensor types:
These sensors transform your basic robot into an intelligent machine that responds to its environment—a critical step toward understanding artificial intelligence in robotics.
DC Motors: Provide the mechanical movement for wheels or other moving parts. Quality motors ensure smooth operation and adequate torque.
Power Bank: Rechargeable power source that keeps your robot running during testing and demonstrations. Choose capacity based on your motor requirements and desired runtime.
Batteries: Backup power for remote control and auxiliary functions.
Understanding how these components work together is fundamental. For a deeper dive into robotic architecture, explore our guide on components of a robot.
Before assembling, decide what type of robot you want to create. Beginners should start with one of these proven models:
Smart Car Robot: A wheeled vehicle perfect for learning basic movement, steering, and sensor integration. This foundational project teaches motor control and navigation principles.
Smart Lamp Robot: A stationary robot focused on light sensing and automated responses. Ideal for understanding sensor programming without complex movement mechanics.
Your choice determines which components you’ll prioritize. Smart cars emphasize motors and motion sensors, while smart lamps focus on light detection and LED control.
Start with your chassis—the robot’s body. Follow these guidelines:
Pro Tip: Leave enough space between components for wire management. Tangled cables cause frustration and potential shorts.

This critical phase connects your robot’s nervous system. Follow the wiring diagram carefully:
Motor Connections:
Sensor Integration:
Power Supply:
Remote Control System:
For those new to electronics, understanding basic circuits helps tremendously. Check out our coding and robotics fundamentals to build confidence.
Now comes the exciting part—bringing your robot to life through code! The ELF 328P microcontroller uses Arduino-based programming, making it accessible for beginners.
Basic Movement Programming:
Start with simple forward/backward motion:
Adding Remote Control:
Program your robot to respond to transmitter commands:
Sensor Integration:
Enhance your robot with environmental awareness:
If you’re new to programming, learning to code in Python or exploring block coding provides excellent preparation for robotics programming.
No robot works perfectly on the first try. Systematic testing identifies issues:
Initial Power Test:
Movement Testing:
Sensor Calibration:
Remote Control Range:
Keep a troubleshooting log noting problems and solutions. This documentation proves invaluable for future projects.
Once you master the basics, these advanced projects expand your capabilities:
Program your robot to track and follow dark lines using IR sensors. This autonomous behavior combines sensor reading with decision-making algorithms. For detailed instructions, see our line follower robot guide.
Key Features:
Use ultrasonic sensors to detect and navigate around barriers automatically. This project introduces spatial awareness and pathfinding logic.
Implementation Steps:
Integrate sound sensors and pattern recognition to respond to voice commands. This advanced project bridges robotics and artificial intelligence.
Technical Requirements:
Leverage the Wi-Fi module for internet control and data logging. Control your robot from anywhere while collecting performance metrics.
Capabilities:
These advanced projects demonstrate the powerful applications of RC robotics beyond simple remote control.
Learning from others’ errors saves time and frustration. Avoid these frequent pitfalls:
The Problem: Rushing into assembly without understanding component relationships leads to incompatible connections and redesign work.
The Solution: Spend 15-20 minutes reviewing your kit’s manual and sketching your design. Identify where each component mounts and how they interconnect before touching a screwdriver.
The Problem: Tangled, loose wires cause intermittent connections, difficult troubleshooting, and potential shorts that damage components.
The Solution: Use cable ties or wire organizers. Route wires along chassis edges. Leave service loops for maintenance. Label connections clearly.
The Problem: Underpowered batteries cause motors to stall, sensors to malfunction, and unstable operation.
The Solution: Calculate total current draw of all components. Select power supplies with 20% overhead capacity. Monitor voltage levels during operation to prevent brownouts.
The Problem: Uncalibrated sensors produce unreliable readings, causing erratic robot behavior.
The Solution: Test sensors in actual operating conditions. Adjust sensitivity thresholds based on environment. Document calibration values for each sensor type.
The Problem: Skipping systematic testing means discovering multiple issues simultaneously, making diagnosis difficult.
The Solution: Test incrementally—power first, then individual motors, followed by sensors, finally integrated systems. Document each test’s results.
The Problem: Copying code examples without comprehension prevents troubleshooting and customization.
The Solution: Study each code section’s purpose. Modify one element at a time. Use serial output to verify program flow. Build understanding through experimentation.
For beginners concerned about programming, our programming robots guide breaks down complex concepts into manageable steps.
Understanding control options helps you choose the right approach for your project:
Advantages:
Limitations:
Best For: Indoor robots, simple directional control, learning basic RC concepts.
Advantages:
Limitations:
Best For: Outdoor robots, competitive robotics, advanced maneuvering.
Advantages:
Limitations:
Best For: IoT projects, web-controlled robots, educational platforms.
| Control Type | Range | Cost | Complexity | Best Use Case |
|---|---|---|---|---|
| IR Remote | 5-10m | Low | Simple | Beginner indoor projects |
| RF 2.4GHz | 50-100m+ | Medium | Moderate | General robotics |
| Wi-Fi | Network-dependent | Medium-High | Advanced | IoT applications |
| Bluetooth | 10-30m | Medium | Moderate | Mobile app control |
Choose based on your project requirements, skill level, and intended operating environment.
Case Study: Middle School Robotics Program
A school in Austin, Texas integrated RC robot building into their STEM curriculum with impressive results:
Initial Challenge: Students lacked hands-on experience with electronics and struggled to connect theoretical concepts to practical applications.
Implementation: Over eight weeks, 45 students ages 11-14 built remote controlled robots using component kits similar to those described in this guide.
Results Achieved:
Key Success Factor: Structured curriculum combined with creative freedom. Students followed core instructions but personalized sensor configurations and behaviors.
Teacher Testimonial: “The transformation was remarkable. Students who initially felt intimidated by circuits were debugging code and designing custom sensors within weeks. The hands-on nature made abstract concepts tangible.”
This success demonstrates the educational power of RC robotics. The combination of immediate feedback, creative expression, and problem-solving creates engaging learning experiences that traditional instruction cannot match.
Students in this program didn’t just build robots—they developed critical thinking, persistence through failure, and confidence in their technical abilities. These are exactly the outcomes that make robotics important in STEM learning.
Building your first remote controlled robot is just the beginning. Here are pathways to advance your expertise:
Connect with other builders through:
Gradually add new sensors and actuators:
Progress beyond basic control with:
Challenge yourself with organized events:
Understand how RC robotics connects to careers:
The skills you develop building RC robots translate directly to professional engineering, programming, and design roles. Early exposure gives students a significant advantage in STEM careers.
A basic RC robot takes 2-4 hours for first-time builders following a structured kit. This includes assembly (60-90 minutes), wiring (45-60 minutes), and initial programming (45-90 minutes). More complex projects with multiple sensors or custom programming can extend to 6-8 hours across several sessions.
Most beginner RC robots use Arduino-based programming, which is a simplified version of C/C++. However, no prior programming experience is necessary—basic functions can be learned in 30-60 minutes. For younger builders, block-based programming platforms like Scratch offer visual alternatives that generate Arduino code.
Children ages 8-10 can build RC robots with adult guidance and supervision. Kids 11 and older with basic tool skills often complete projects independently after initial instruction. The key is choosing age-appropriate kits and providing support during challenging steps like circuit connections and code troubleshooting.
Complete beginner kits with all necessary components range from $40-$80. Mid-level kits with additional sensors cost $80-$150. Advanced projects with specialized components may reach $200-$300. However, these investments provide months of learning and can be reused across multiple projects.
Remote controlled robots require continuous human input through a transmitter. The operator decides every movement and action. Autonomous robots use sensors and programming to make independent decisions and navigate without human intervention. Many modern RC robots combine both—remote control for basic operation plus autonomous modes for specific tasks like obstacle avoidance.
Most beginner and intermediate RC robot kits require no soldering. Components connect through plug-and-play interfaces, jumper wires, and screw terminals. Soldering only becomes necessary for advanced customization, creating permanent installations, or building from individual components rather than kits.
First, verify the remote has fresh batteries and the receiver module is powered. Check that transmitter and receiver are properly paired according to manufacturer instructions. Inspect wire connections between receiver and mainboard—loose connections cause signal loss. Test in an area away from potential interference sources like Wi-Fi routers or other wireless devices.
Yes, if your kit includes a Wi-Fi or Bluetooth module. Smartphone control requires programming a communication protocol and often a companion app. Some kits offer ready-made apps; others require custom development. This advanced feature provides excellent practice with wireless communication and interface design.
You now have everything needed to begin your RC robotics journey. From understanding core components to programming autonomous behaviors, this guide provides the complete roadmap for success.
Remember the key principles:
Building remote controlled robots offers far more than entertainment. It develops problem-solving abilities, technical skills, and creative confidence that serve students throughout their educational and professional lives. Whether you’re a parent supporting your child’s interest in technology or a student eager to explore coding and robotics, taking that first step into RC robot building opens doors to endless possibilities.
The most important component isn’t in your kit—it’s your curiosity and willingness to experiment. Your first robot might be imperfect, but each project builds knowledge that lasts a lifetime.
Ready to transform from observer to creator? Gather your components, review this guide, and start building. Your remote controlled robot awaits!