Reading Time: 11 mins
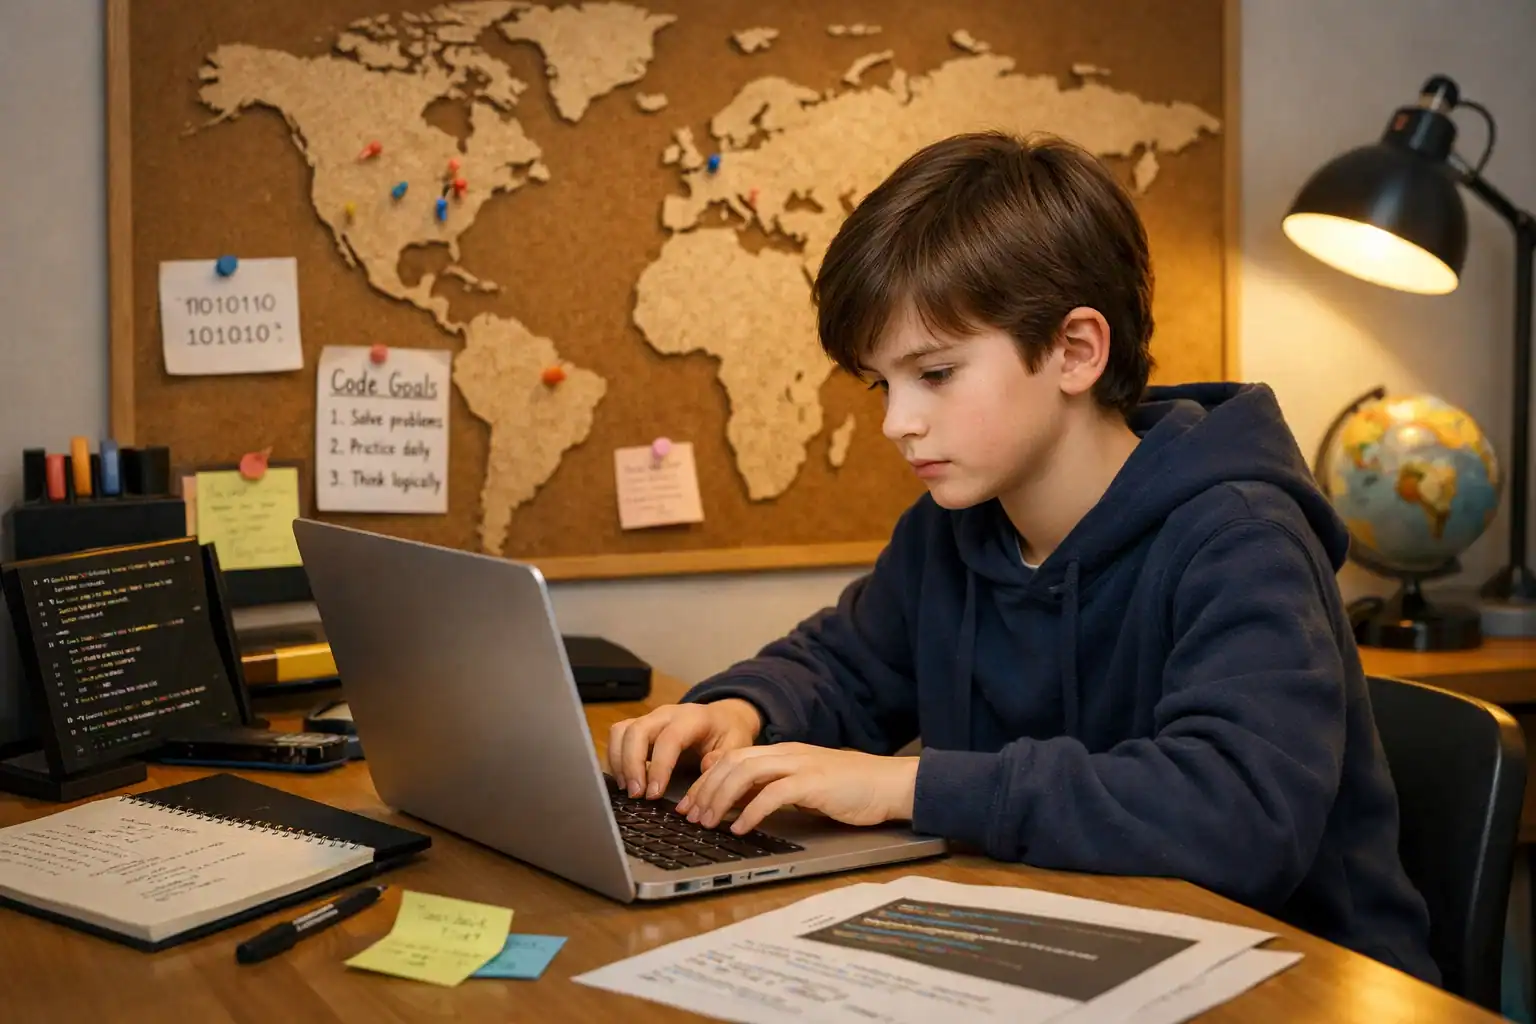
Turn screen time into skill time! Ready to create your very own Shadow Milk Scratch game? This beginner-friendly tutorial walks you through every step of building an interactive game where a shadowy character follows the player around. Perfect for kids learning to code and anyone new to Scratch programming.
Shadow Milk Scratch game is a fun coding project where you control a character (Milk) that moves around different rooms while a mysterious shadow follows every move. It’s a great way to learn key programming concepts like sprite movement, cloning, and game states.
What You’ll Learn:
Skill Level: Beginner to Intermediate
Recommended Age: 8+ years
Time Required: 30-45 minutes
Before diving into this shadow milk scratch game tutorial, make sure you have:
How to set up your project:
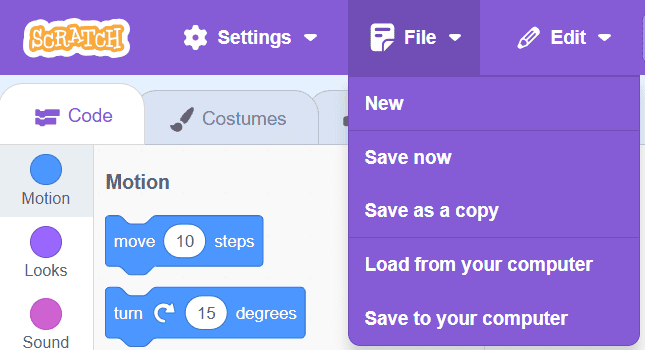
Pro Tip: Save your work frequently as you progress through this shadow milk scratch game guide for beginners. Use File > Save now after completing each major section.
Your shadow milk scratch game needs three main sprites:
How to add sprites:

Your game needs two rooms:
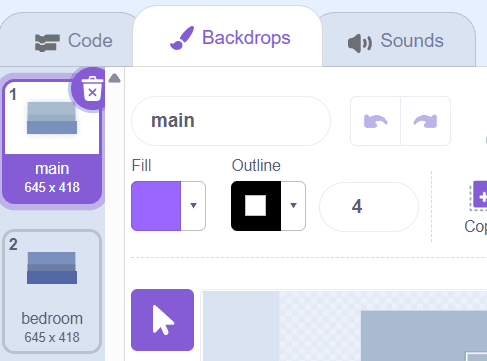
Main Room Backdrop:
Bedroom Backdrop:
Design Tip: Keep your backgrounds simple and uncluttered. This helps players focus on the character movement and shadow mechanics.
Variables and lists are the backbone of how to code shadow milk scratch game logic.
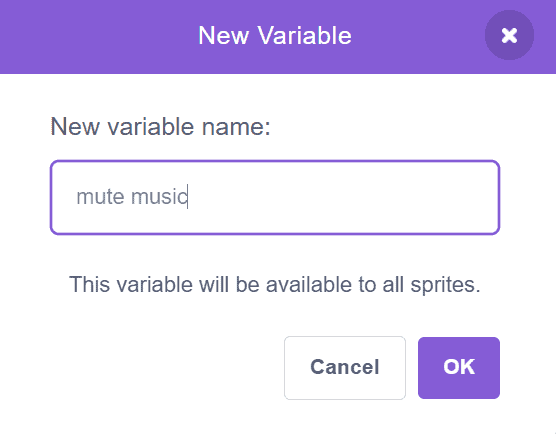
Create these variables (available to all sprites):
How to create variables:

Switch to your Milk sprite and create these lists:
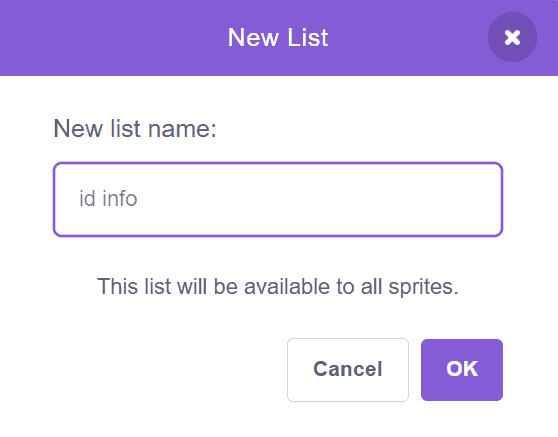

What are lists? Lists store multiple pieces of information in one place, like a shopping list holds multiple items. They’re essential for managing multiple objects in your game.
The Stage acts as your game’s central controller, managing room changes and music.
Broadcast messages let different sprites communicate. Create these messages:
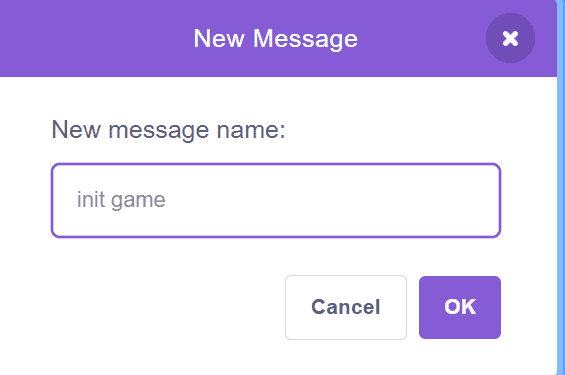
How broadcast messages work: Think of them like walkie-talkies. When the Stage broadcasts “enter bedroom,” all sprites listening for that message will respond.
Add this code to the Stage:
When green flag clicked:
When green flag clicked
└─ broadcast [init game]
When init game received:
When I receive [init game]
├─ switch backdrop to [main]
├─ set [game state] to [play]
├─ set [mute music] to [0]
└─ broadcast [enter main room]
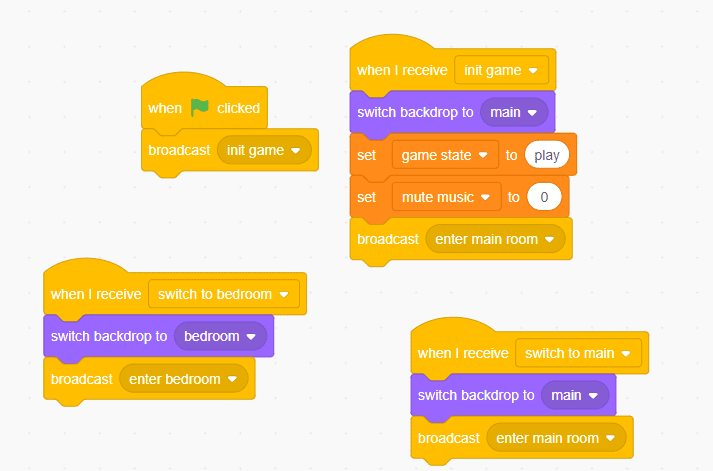
Room switching receivers:
When I receive [switch to bedroom]
├─ switch backdrop to [bedroom]
└─ broadcast [enter bedroom]

When I receive [switch to main]
├─ switch backdrop to [main]
└─ broadcast [enter main room]
Now let’s make your character move! This is where your shadow milk scratch game for kids really comes alive.
Custom blocks help organize your code and make it reusable.
How to create the custom block:
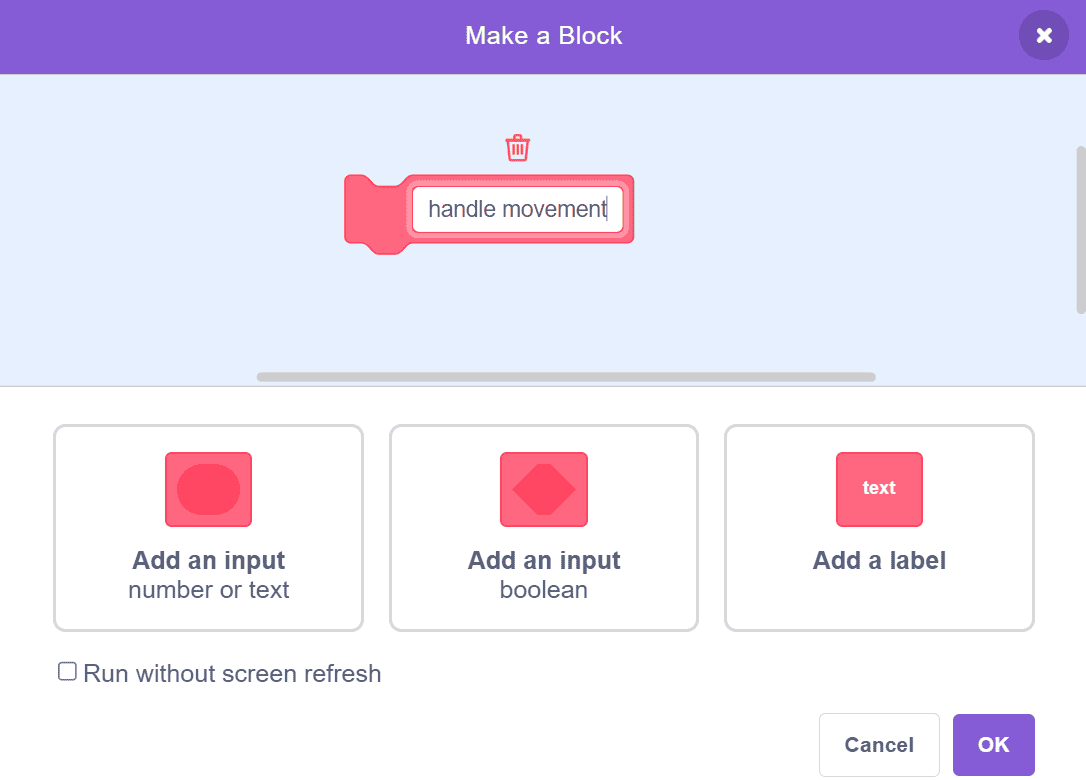
Add this code to the Milk sprite:
When init game received:
When I receive [init game]
├─ go to x: (0) y: (0)
└─ show
When green flag clicked:
When green flag clicked
├─ hide
├─ go to x: (0) y: (0)
└─ set [walk anim] to [0]
Room entry positioning:
When I receive [enter bedroom]
└─ go to x: (-100) y: (-50)

When I receive [enter main room]
└─ go to x: (0) y: (0)

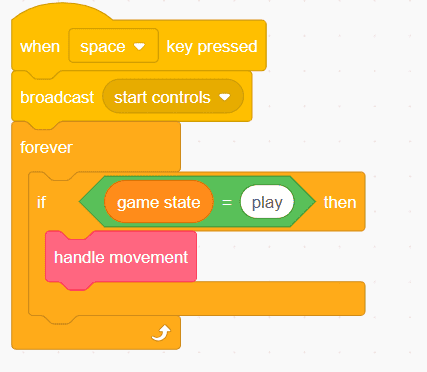
This is the heart of how to play shadow milk scratch game – the arrow key controls!
Continuous movement loop:
When [space] key pressed
├─ broadcast [start controls]
└─ forever
    └─ if <[game state] = [play]> then
        └─ handle movement
Define handle movement block:
define handle movement
├─ if <key [right arrow] pressed?> then
│  ├─ change x by (4)
│  ├─ point in direction (90)
│  └─ change [walk anim] by (1)
│
├─ if <key [up arrow] pressed?> then
│  ├─ change y by (4)
│  ├─ point in direction (90)
│  └─ change [walk anim] by (1)
│
├─ if <key [down arrow] pressed?> then
│  ├─ change y by (-4)
│  ├─ point in direction (90)
│  └─ change [walk anim] by (1)
│
└─ if <key [left arrow] pressed?> then
   ├─ change x by (-4)
   ├─ point in direction (90)
   └─ change [walk anim] by (1)
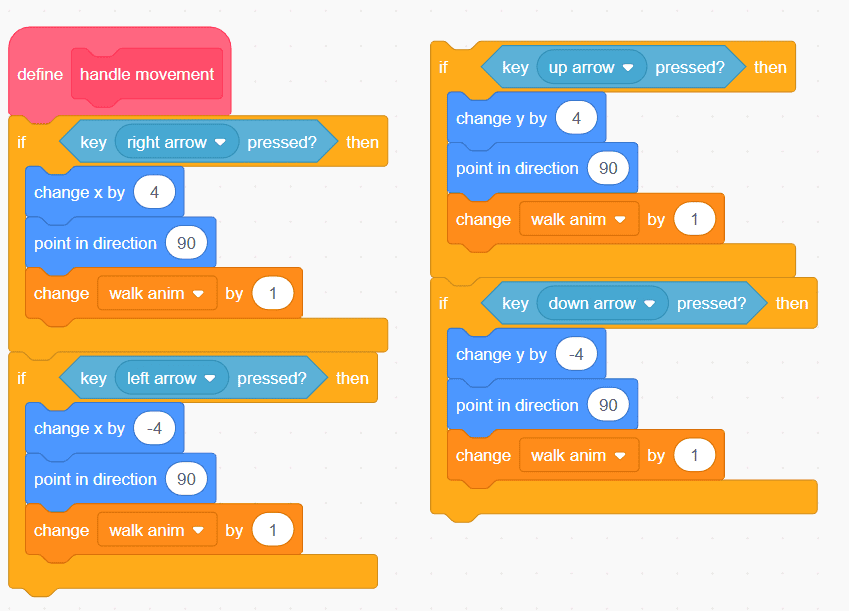
How movement works: Each arrow key changes the character’s position by 4 pixels and updates the walk animation counter. The direction is set to 90 degrees (facing right) for visual consistency.
Add animation by cycling through costumes:
if <[walk anim] > [5]> then
├─ set [walk anim] to [0]
└─ next costume
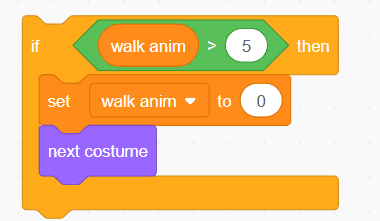
Animation tip: The walk animation counter increases as you move. When it exceeds 5, it resets and switches to the next costume, creating a walking effect.
Here’s where the magic happens – creating a shadow that mimics your every move!
How to duplicate the Milk sprite:

Adjust shadow appearance:

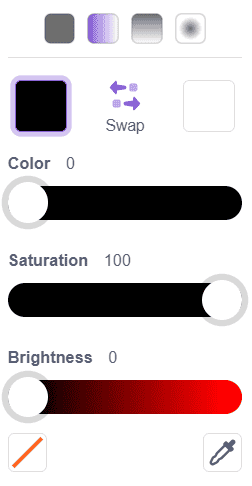
Visual effect: This creates that eerie, shadowy appearance that makes your game mysterious and engaging.
Add this code to the shadow sprite:
When green flag clicked:
When green flag clicked
├─ hide
└─ forever
    └─ if <[game state] = [play]> then
       ├─ show
       ├─ go to [stupid milk]
       ├─ go back (1) layers
       ├─ set [ghost] effect to (50)
       └─ set [brightness] effect to (-100)
    else
       └─ hide

How the shadow works: The shadow constantly moves to the Milk sprite’s position but stays one layer behind. The ghost effect (50%) makes it semi-transparent, and the brightness effect (-100) keeps it dark.
Troubleshooting tip: If your shadow appears in front of the player, adjust the “go back” layer value or ensure the shadow sprite is below the Milk sprite in the sprite list.
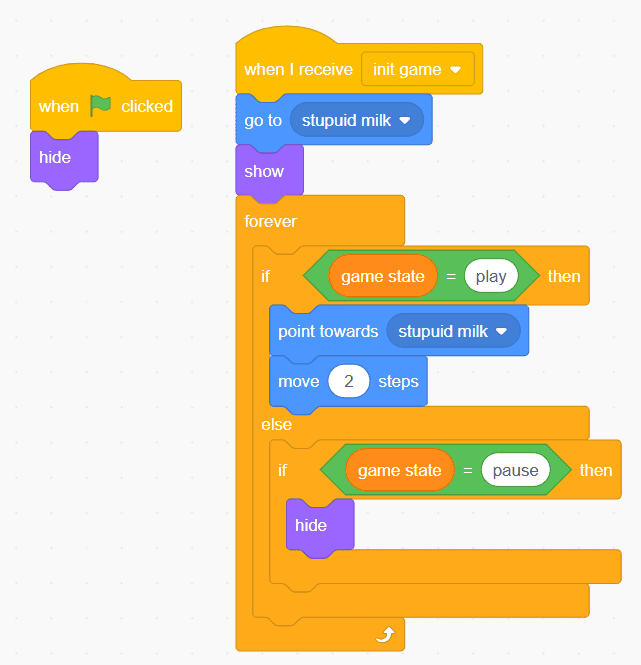
Interactive objects make your game world feel alive! Let’s add furniture that triggers room changes.
Initial furniture code:
When green flag clicked
└─ hide

When I receive [init game]
├─ go to [stupid milk]
└─ show
Game state management:
forever
├─ if <[game state] = [play]> then
│  ├─ point towards [stupid milk]
│  └─ move (2) steps
└─ else if <[game state] = [pause]> then
   └─ hide
How to trigger room changes:
When this sprite clicked
└─ if <touching [stupid milk]?> then
    └─ broadcast [switch to bedroom]
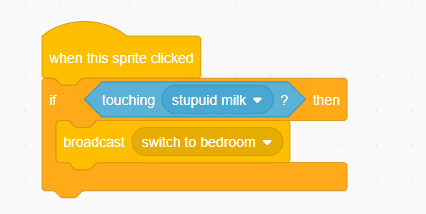
How this works: When you click furniture AND your character is touching it, the game switches rooms. This creates an intuitive point-and-click adventure feel.
Design variation: You can add multiple furniture pieces with different interactions:
Clones let you create multiple copies of sprites efficiently – perfect for collectibles or decorative items!
Setting up the cloning loop:
When I receive [enter main room]
└─ repeat (5)
    └─ create clone of [myself]
Individual clone behavior:
When I start as a clone
├─ show
├─ go to x: (pick random -200 to 200) y: (pick random -120 to 120)
└─ forever
    ├─ if <[game state] = [play]> then
    │  └─ change y by (1)
    └─ else if <touching [stupid milk]?> then
       ├─ broadcast [milk interacted]
       └─ delete this clone
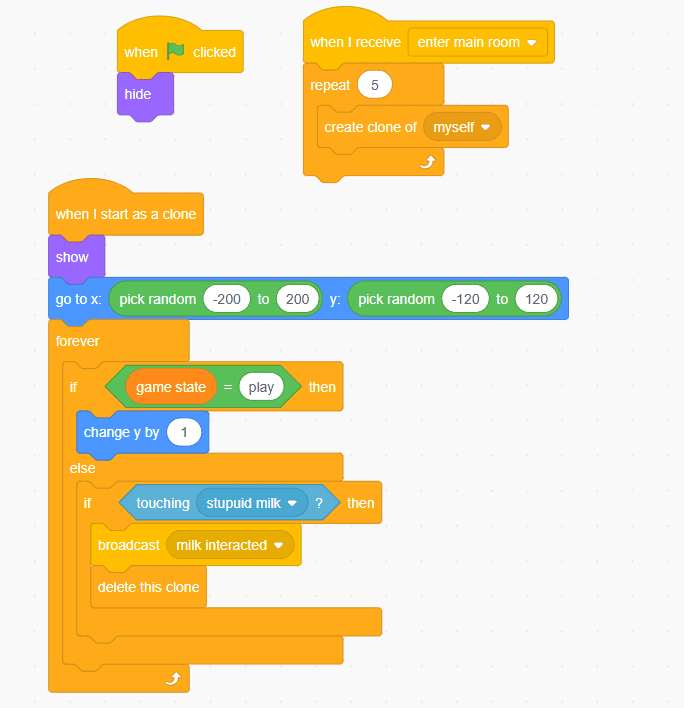
What are clones? Think of clones like photocopies – each one is an independent copy that can move and act separately. They’re perfect for creating multiple sparkles, coins, or other collectible items.
Prevent sprite pile-up:
When green flag clicked
└─ hide

When I receive [reset sprites]
└─ delete this clone
Why cleanup matters: Without proper cleanup, clones can accumulate and slow down your game. Always delete clones when switching rooms or resetting.
User interface elements help players interact with your game beyond just movement.
Creating the button sprite:
Button positioning:
When green flag clicked
├─ show
└─ go to x: (210) y: (150)
Toggle functionality:
When this sprite clicked
├─ if <[mute music] = [0]> then
│  └─ set [MUTE MUSIC] to [1]
└─ else
   └─ set [MUTE MUSIC] to [0]
└─ broadcast [update music controls]
Visual feedback:
When I receive [update music controls]
├─ if <[MUTE MUSIC] = [0]> then
│  └─ switch costume to [music on]
└─ else
   └─ switch costume to [music off]

Add this to the Stage:
When I receive [update music controls]
├─ if <[MUTE MUSIC] = [0]> then
│  └─ forever
│     └─ if <[MUTE MUSIC] = [1]> then
│        ├─ stop all sounds
│        └─ stop [this script]
│     └─ else
│        └─ play sound [click2] until done
└─ else
   └─ stop all sounds
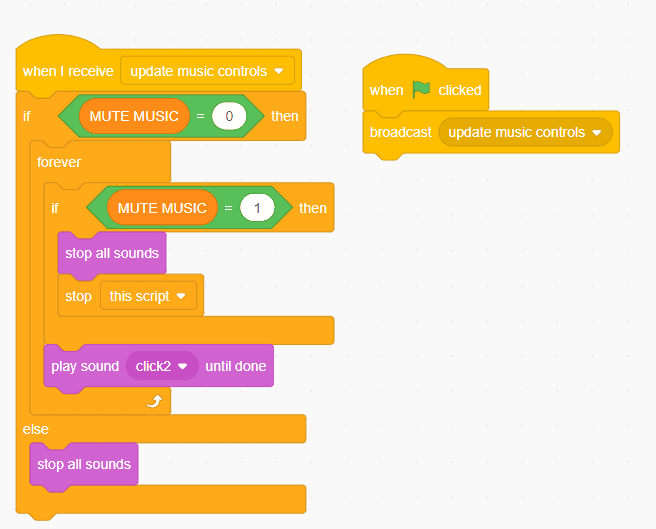
User experience tip: Always provide visual feedback when players click buttons. The costume change lets them know their click registered.
Replace the default mouse cursor with a custom design for a polished look!
Simple cursor following:
When green flag clicked
└─ forever
    └─ go to x: (mouse x) y: (mouse y)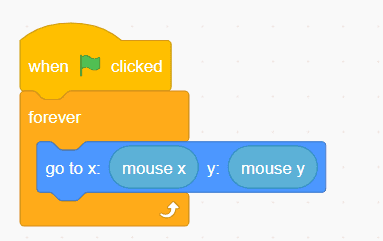
Optional enhancements:
Hiding default cursor: In the full game, you’d add a block to hide the default pointer, but Scratch 3.0 requires a browser extension for this feature.
Every good game needs a way to start fresh! Let’s build the reset functionality.
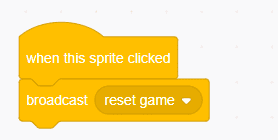
On the Stage, create this block:
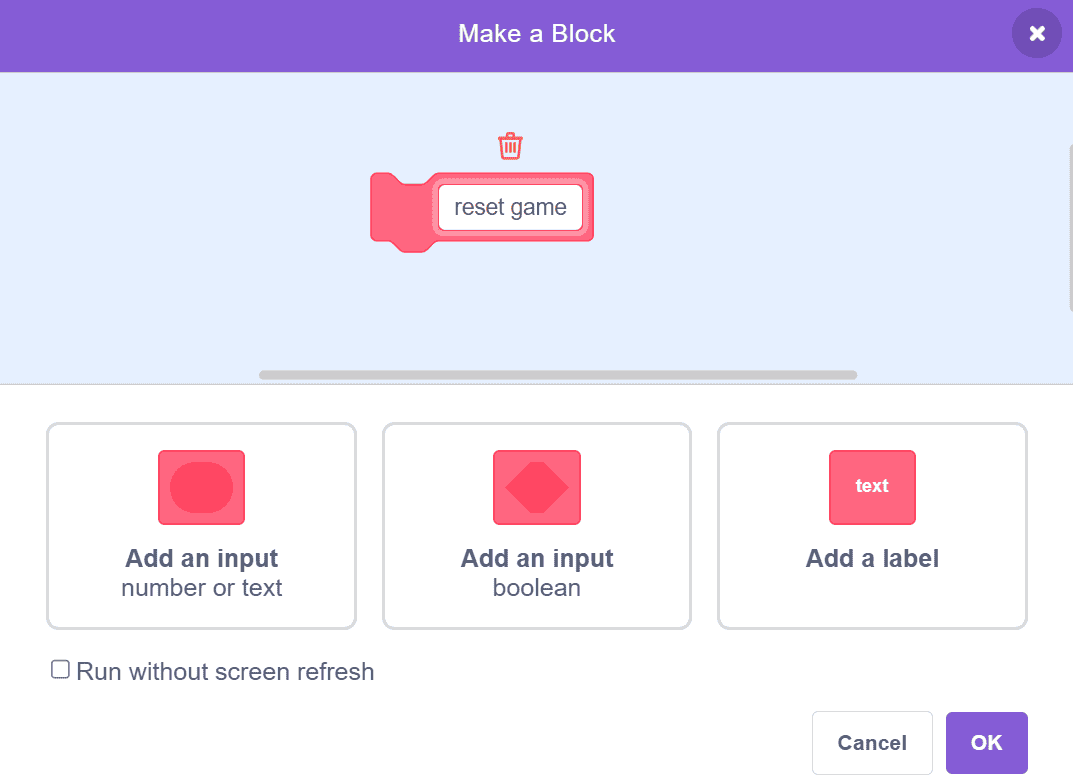
Reset broadcast message:
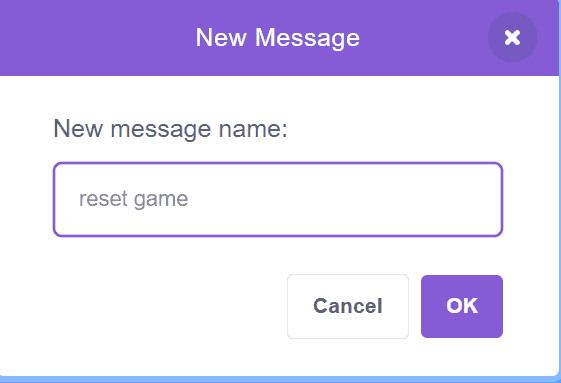
Define the reset block:
When this sprite clicked
└─ broadcast [reset game]
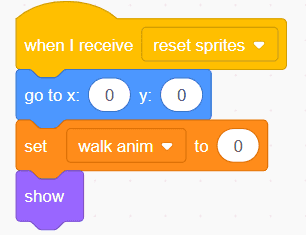
Milk sprite reset:
When I receive [reset sprites]
├─ go to x: (0) y: (0)
├─ set [walk anim] to [0]
└─ show
Objects/Effects sprites:
When I receive [reset sprites]
└─ delete this clone
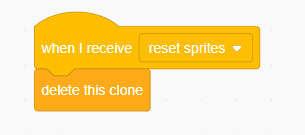
Complete reset sequence: When the player clicks the reset button, all variables return to default values, all clones are deleted, the player returns to the starting position, and the game state resets to “play.”
Problem: Shadow appears in front of player
go back (1) layers to shadow code after go to [stupid milk]Problem: Arrow keys don’t move character
Problem: Room transition doesn’t work
Problem: Clones don’t disappear when resetting
when I receive [reset sprites] → delete this clonePerformance optimization:
hide instead of setting ghost effect to 100Visual improvements:
Gameplay enhancements:
Simplified features:
Added complexity:
Congratulations! You now know how to create shadow milk scratch game from scratch. You’ve mastered:
Core programming concepts:
Game design elements:
Next steps in your coding journey:
The shadow milk scratch game uses sprite cloning and positioning logic to create a shadow that continuously moves to the player’s location while staying one layer behind. The game state variable controls whether sprites are active, and broadcast messages coordinate actions across multiple sprites.
Shadow milk scratch game is perfect for teaching fundamental game development concepts like sprite control, state management, and clone systems. It’s an excellent project for beginners learning Scratch programming and students aged 8-14 exploring game design.
Most beginners can complete the basic shadow milk scratch game in 30-45 minutes following this step-by-step guide. Adding custom features and polish might take an additional 30-60 minutes depending on your creativity and experience level.
Absolutely! The best way to make shadow milk scratch game your own is to:
Popular additions include:
You’ve just learned how to code shadow milk scratch game in Scratch – now it’s time to make it your own! At ItsMyBot, we believe every child can become a confident creator.
Show us what you built:
Ready for more challenges? Explore our other Scratch tutorials to keep building your coding skills. Remember: every expert coder started exactly where you are now – with curiosity and one project at a time.
About ItsMyBot
We turn screen time into skill time with personalized, industry-level coding courses for kids aged 5-15. Through hands-on projects like this shadow milk scratch game tutorial, children build creativity, confidence, and future-ready skills while parents stay informed every step of the way.
Start Your Coding Journey Today →
Project Link: https://scratch.mit.edu/users/GPE_sb3/